

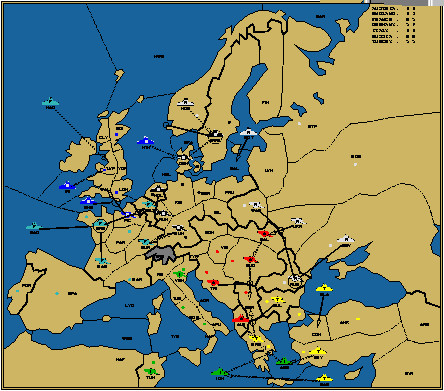
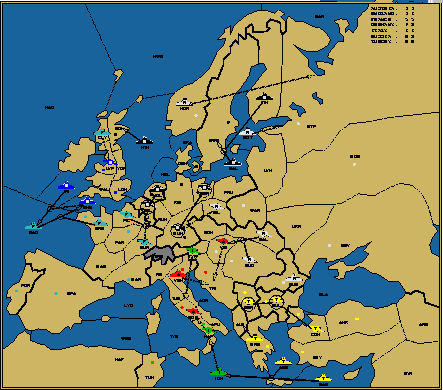
A few issues of the Pouch ago, I wrote an article called "Caissa at the Diplomacy Table." That article probably got more positive responses than all the other stuff I've written put together, so I felt like a follow up to that would be a pretty good idea. In this follow-up article series, we'll see what practical application can be made of the principles of time, space, and force in a no-press game. The game was alicew on the USEF judge, a no-press gunboat game for experienced players organized from the DipPouch queue system. I played the Russian position and the analysis will proceed from that point of view.
In this first article, we will get through the opening years of the game, discussing the orders for each power on each turn. In the next issues of The Pouch, the end-game will be analyzed in exactly the same fashion that is presented here.
I hope to do more than describe the game and comment about my motives. I'd like to use this exercise to illustrate my Caissic theories of tactical play. One of the differences I've observed between chess literature and Diplomacy literature is that analyzing games as a learning tool is one of the main bodies of chess literature, but is rare in the 'net Diplomacy literature. I think, however, that the exercise can be as valuable and meaningful to Diplomacy players as to chess players.
I may not have chosen the best possible game for a first effort, since alicew went twenty-three years. This game is so rich in tactical lessons, however, that I couldn't resist digging into it. Since the analysis will be spread over the next few Pouch Zine issues, there is obviously no need to play through the whole game at one sitting. The purpose of this kind of exercise, after all, is to proceed slowly and analyze thoroughly. So presenting only a subset of the game (in this first case, the opening stages) will allow and encourage you to what I hope will prove a valuable depth of study, if you are so inclined. I also, of course, hope that you will enjoy the narrative.
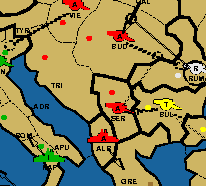
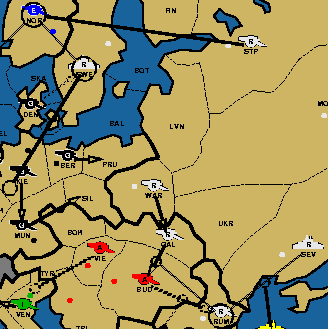
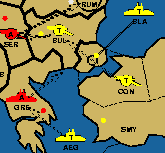
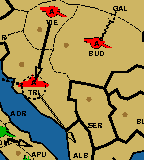 Austria: A Bud - Gal (*bounce*)
Austria: A Vie - Tri
Austria: F Tri - Alb
As far as I can tell, this is an uncommon opening for Austria. I reviewed numerous opening strategy articles for Austria and could find no discussion of this opening other than in Richard Sharp's book. It's a variation on the Hedgehog theme, but less hostile looking. Austria protects himself from incursions into Galicia and Trieste, and is positioned to take Serbia and/or Greece for a Fall build. Although neither Serbia nor Greece is guaranteed, he'll very likely get one of them. Austria is unlikely to make big gains in time or space with this opening, but given his need to secure the key provinces of Galicia and Trieste without the benefit of negotiation, it is positionally solid.
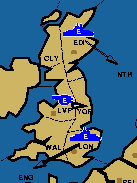 England: A Lvp - Yor
England: F Edi - NTH
England: F Lon - ENG
Opening to the Channel seems more popular in no-press games, presumably because English players are a lot more concerned with securing this key province when they can't negotiate with France. The tradeoff is that England risks antagonizing France before the French player has shown his own hand. It's not automatically hostile to France, however, and the French player need not panic at the sight of an English fleet in the Channel, since England's force influence over Brest and Mid-Atlantic is presently neutralized by the French fleet. England's forces aggressively concentrate on Belgium forcing the immediate attention of both France and Germany.
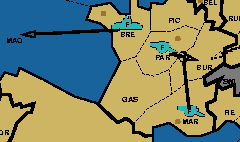 France: A Mar S A Par - Bur
France: A Par - Bur
France: F Bre - MAO
The Maginot Opening for France guarantees a build and asserts influence over all three neutral supply centers within reach. The French home provinces are all secure, while the French player is projecting his influence outward. I don't see why forcing the occupation of Burgundy should be regarded as directly hostile to Germany, as France cannot gain decisive control of any province within Germany this way, but my experience in press games is that Germany typically reacts quite negatively to this opening.
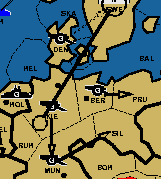
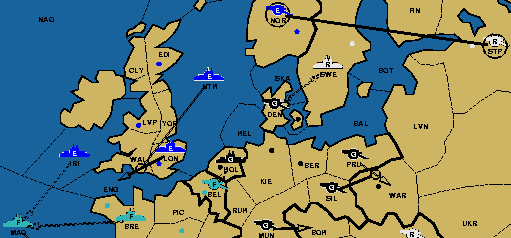
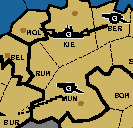 Germany: A Ber - Kie
Germany: A Mun - Bur (*bounce*)
Germany: F Kie - Hol
Germany announces a full commitment to western affairs with this opening, giving up influence over Sweden in the Fall, while projecting minimal power north and none east, all in hopes of obtaining a greater influence over Belgium and western provinces in general. I'm generally opposed to using the Berlin army to take Denmark, but especially opposed in no-press. An army is badly misplaced in Denmark owing to its inability to project influence over most of the surrounding provinces. It can very easily become stuck there--passive and useless for anything other than defending Denmark.
 Italy: A Rom - Apu
Italy: A Ven S (Austrian) F Tri (*void*)
Italy: F Nap - ION
Italy positions himself for a Lepanto and signals the same to Austria. Italy is guaranteed a build, but it's hard enough to succeed against Turkey as Italy with a firm commitment by Austria in press, never mind without. On the positive side is that the primary disadvantage of the Lepanto -- the lengthy time it takes to pull it off -- is somewhat negated by the no-press environment, in which initial progress is often slow for everyone. Even though it's tough to coordinate a Lepanto with Austria without press, this will give Turkey something to worry about and he'll have some incentive to arrange an alliance with Russia--I hope.
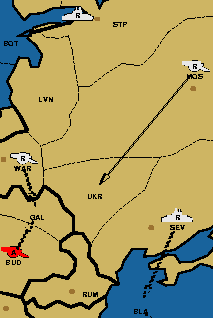 Russia: A Mos - Ukr
Russia: A War - Gal (*bounce*)
Russia: F Sev - BLA (*bounce*)
Russia: F StP/sc - BOT
I chose this opening because it logically attempts to commit the bulk of Russia's force resources to exercising influence over a group of key provinces in a specific region of the board. I'm now exercising a decisive level of influence over both Galicia and Rumania and progress should ensue. I'm dubious about northern openings as Russia in a no-press game, as a bounce in Sweden can't be discounted, which would be virtually fatal. It's also very speculative as to whether, without the benefit of negotiations, England and Germany will allow Russia early domination in an area of the board that they both regard as their own backyard. My feeling is that, when playing Russia in no-press, it's better to begin operations in the south, where your forces can be concentrated early to maximum effect, while Scandanavia is much more obtainable as a second operation, after E/F/G have turned to infighting.
 Turkey: A Con - Bul
Turkey: A Smy - Con
Turkey: F Ank - BLA (*bounce*)
A neutral opening for Turkey. It guarantees the build, projects force into the key provinces of Bulgaria and Black Sea, and betrays nothing of his plans.
Overall, I'm very pleased with the openings. My minimal force commitment to the north has been mirrored by Germany, who has conceded me Sweden. There is reason for early tension between the western powers, which should keep Germany away from me for a couple of years and could make me a kingmaker in Scandanavia. In the south, Rumania is a virtual lock for a second build and I'm likely to make good progress into Austrian provinces, especialy if Turkey decides to become my ally. With the smell of Lepanto in the air, an R-T alliance seems like a likely continuation.
 Austria: A Bud S (Turkish) A Bul - Rum (*void*)
Austria: A Tri - Ser
Austria: F Alb - Gre (*bounce*)
That order for the army in Budapest is bad. The Turkish army in Bulgaria has three logical choices for orders other than attacking Rumania (attack Serbia, attack Greece, or support a power into Greece), giving the order no better than one in four odds of being immediately useful. The move could be defended as a "signal" move proposing alliance to Turkey. The need to exercise that army's force influence over Galicia this turn, however, was far more important than the attempted signal of alliance to Turkey. Austria will pay a stiff price for failing to project power into Galicia with that army.
 England: A Yor - NTH - Nor
England: F NTH C A Yor - Nor
England: F ENG - Bel (*bounce*)
England makes the "natural" convoy to Norway and takes the certain build. This "natural" move should still be disturbing to any Russian, as that army, with its ability to penetrate inland, is the most natural spearhead for England's expansion plans. Placing an army in Norway is, consequently, much more antagonistic to Russia's interests that a fleet. An alternative to attacking Belgium was to play kingmaker with that SC by supporting someone in and hope to gain an ally thereby. This is a strategy that makes sense in both press and no-press games. The beauty of this approach is that, with his fleets in the Channel and the North Sea, England still weilds decisive influence over Belgium, even after someone else takes it. If England doesn't get a good response to his generosity, he likely will have the option to claim Belgium for himself in 1902.
 France: A Mar - Spa
France: A Bur - Bel (*bounce*)
France: F MAO - Por
France goes for all three neutrals within reach, fearlessly ignoring the English fleet in the Channel. Given a choice between wasting a tempo on passive defense or attempting to pick up extra force, he goes for the latter option. Taking both Iberian neutrals in 1901, however, takes two-thirds of the French forces away from the front in 1901 and there is a loss of tempi involved in bringing them back to a useful position. French players shouldn't be afraid to capture the Iberian neutrals one at a time if they have an opportunity to work out an aggressive plan with a willing neighbor. The more efficient use of early tempi by one's starting force can justify the slower accumulation of new force.
 Germany: A Kie - Den
Germany: A Mun H
Germany: F Hol - Bel (*bounce*)
I don't see the benefit in the Hold order for the army in Munich. If he wants to be France's friend he should order a support for the army in Burgundy. Alternatively, he should consider attacking Burgundy, to encourage England to attack France, under the assumption of German support. He could even order the army to Ruhr. Unless France boldly seeks to march into an occupied Munich (unlikely), that will free Munich for a build and allow Germany to project potentially decisive force influence against Burgundy and Belgium in 1902. That Hold order doesn't do anything for Germany, either tactically or diplomatically.
 Italy: A Apu - ION - Tun
Italy: A Ven S (Austrian) A Tri (*void*)
Italy: F ION C A Apu - Tun
Italy continues his Lepanto strategy with this convoy. My feeling is that if Italy convoys an army to Tunis, he'd better have a plan for quickly getting it off again, because it's pretty useless as long as it's there.
 Russia: A Ukr - Rum
Russia: A War - Gal
Russia: F Sev S A Ukr - Rum
Russia: F BOT - Swe
Thanks to Austria's gaffe, I'm in Galicia and Rumania with armies. From here my influence over space is already extending to two of Austria's home SC's. The trade off for using the army to take Rumania is that I can't build in Sevastopol. That's not actually bad, as that is my version of a friendly overture to Turkey this turn. He'll almost certainly build a fleet in Smyrna, since his main concern must be the threatened Lepanto, while I do not threaten to build against him. That Turkey would occupy the Black Sea was predictable. It's not a serious concern. The force influence he creates accross Rum/Sev/Arm thereby is still countered by my own Fleet and he is very unlikely to follow up with a fleet build in Ankara, given the Italian moves.
 Turkey: A Bul - Gre (*bounce*)
Turkey: A Con - Bul (*bounce*)
Turkey: F Ank - BLA
Turkey's attack on Greece can rightly be called a "neutral" move, though it clearly hurts only Austria. Greece, like Belgium, cannot rightly be called the "natural" of any power. If Turkey does not want to give it away, Austria should not blame him. Repeating the attack on the Black Sea is not necessarily hostile either, as Turkey has just as much "right" to project force there as Russia. Thus, Turkey's Fall of 1901 is merely a logical extension of his Spring moves, a neutral attempt to influence key provinces without playing favorites.
Apart from my easy progress against Austria, I'm less pleased with the Fall of 1901 than I was with the Spring. My primary concern is that England, by convoying the army to Norway, has done much to defuse the tension between himself and his neighbors, while projecting influence into my own backyard. He's indicated that he is interested in making gains where they threaten Russia as much or more than his more immediate neighbors. Further, neither Germany nor France offered an early provocation against the other. There wasn't the F01 western war that I'd hoped for as a distraction from me for Germany and England.
Austria:| | B A Vie
| Italy: | | B F Nap
| Turkey: | | B F Smy
| |
The Austrian, Italian and Turkish builds are as expected. Austria and Turkey are defending against their most obvious threats and Italy is following through with his Lepanto strategy.
England:| | B A Lon
| France: | | B F Bre, F Mar
| Germany: | | B A Ber, A Kie
| |
Western builds are more interesting. England's build restores the tension between himself and his neighbors that the convoy eased a moment ago. He would have been well advised to keep his hand hidden with a build of F Edi. France's double barreled fleet build is an interesting strategy and an apparent peace overture to Germany, though it's unclear whether he means to threaten Italy, England or both. Conversely, Germany has built two armies. This is a peace overture to England, plus, it creates a unit advantage for himself in a land war with France.
Russia: | | B A War, A StP
| |
My own build is unorthodox. Most players would regard F StP/nc as the only sensible build other than A Mos. I don't want to build A Mos, however, because I think that one more army in the southern theater is all I need for 1902, and that's going to be where the A War goes. The only other purpose of an army in Moscow is defense, but Russia's opening advantage of an extra unit (and the extra tempi it carries) calls for the attempt to use that advantage early while it can still be significant, so I prefer to build in StP where there is more immediate potential for gain in Scandanavia. My experience has been that a fleet/army pair is a better fighting group in Scandanavia than two fleets. The army is often able to project power on this peninsula more effectively than a second fleet, due to the bi-coastal nature of the geography.
| Power | Tempo | |
|---|---|---|
| Available | Accomplished | |
| Austria | 6 | 3 |
| England | 6 | 5 |
| France | 6 | 4 |
| Germany | 6 | 3 |
| Italy | 6 | 3 |
| Russia | 8 | 5 |
| Turkey | 6 | 3 |
Although tempo count is going to look like objective numbers, it's more art than science. Rather than count up the number of successful moves, my idea is to count the result in terms of distance of each unit from the home SC in which it started. I think that will give a much more accurate picture of progress than merely counting successful movements. Tempo is also a relative thing. Overall tempo accomplishment is a good indication of who is leading the mobilization effort, but it doesn't tell one everything. One also needs to take into account the degree to which the tempi of one's opponents were directed against oneself, one's allies and one's enemies.
Note that, for England and Italy, I count each step of a convoyed army as a tempo, as well it should be. I have often seen other authors describe a convoy as a waste of time because the convoying fleets do not move. That's not precisely true. What is occurring is that the convoying fleets are transferring their movement potential to the convoyed army. Convoys are often the quickest way to accomplish a given task (and occasionally the only way). Readers may wish to peruse the many Sherlock Holmes puzzles published at the Pouch. Convoys are the key to many of these puzzles' solutions. Several of these puzzles dramatically illustrate the power of convoys to speed movement in a way that would not be possible by any other method.
I've been as tempo-efficient as anyone and I've got more units of force than anyone. Absent Austro-Turkish cooperation, I'm in firm control of the chain of provinces from Rum-Gal-War-Lvn and am already disputing control of the Boh-Sil-Pru zone. Since Italy is playing for a Lepanto, I am expecting cooperation from my Turkish neighbor against Austria. With a pair of units poised for action in Scandanavia, I'm also in a position to exert decisive influence against the lone English and German units in that area of the board. I'm concerned about the English army in Norway, but not overly so, as I expect to see conflict heat up between France and England after three fleet builds between them. My guess at this point is that France will get caught between the English fleets and the German armies. I've started well and have every reason to believe things will get better.
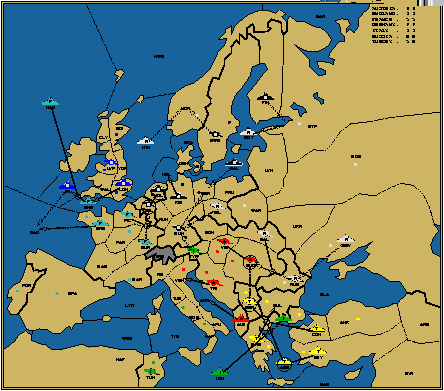
 Austria: A Bud - Rum (*bounce, dislodged*)
Austria: A Ser S A Bud - Rum (*cut*)
Austria: F Alb - Gre
Austria: A Vie S (Italian) A Ven - Tyr (*void*)
Strategically, Austria has the right idea with this attempt at active defense (i.e. attacking Rumania with support), but the tactics misfire. There's nothing wrong with his order for the army in Vienna, since marching the Italian army from Venice through Tyrolia and Bohemia is a common Lepanto maneuver and trying to support it is a worthwhile gamble. The coordination of the armies in Budapest and Serbia, however, is backwards. Austria cannot know if I will attack Budapest from Galicia or from Rumania. If the attack comes from Galicia, the defense will fail, since the army in Rumania will certainly be supported by the fleet in Sevastapol (and there is no rational reason to hope that Turkey would cut that support by attacking Sevastapol). If Austria orders A Ser-Rum, A Bud S A Ser-Rum, however, the result is either to stand off the Russian attack on Budapest, or to exchange Rumania for Budapest. These orders also eliminate from the analysis a potential cut of the Serbian army's support by Turkey (which is what actually occurred). In fact, only the unlikely combination of A Rum-Bud, A Gal S A Rum-Bud, F Sev-Rum, Turkish F Bla S Russian F Sev-Rum (or some other variation of supported attack on Rum by Turkey and/or Russia) defeats this defense. The moves actually chosen by Austria may be defeated 50% of the time by Russia alone and by any number of combinations of Russian and Turkish moves together. In fact, in combination with A Vie S A Bud, this defense would have been rock solid. What at first glance looks like bad luck or bad guessing by Austria is, in fact, a tactical misplay.
 England: A Nor S (Russian) F Swe
England: F NTH S A Nor
England: F ENG - IRI
England: F Lon - ENG (*bounce*)
England extends an olive branch to Russia, while declaring war on France. Note that England's need to passively defend his army in Norway costs him the opportunity to exert decisive force over the Channel. Trying to split his interests between Scandanavia and France this early in the game is already costing him. It would have been better for him to convoy that army south in 1901 if he had intended an attack on France or, conversely, to follow up his 1901 strategy consistently by building in Edinburgh and pursuing an advantage in Scandanavia. As it stands, England can't possibly succeed against France alone. He doesn't have a decisive force advantage due to the two French fleet builds, and France is more than capable of exerting sufficient control over the critical blue water provinces that separate England and France. I think that, like me, England was anticipating a German attack on France. That Italy decided to move against France is about to come as an undoubtedly pleasant surprise, but as to Germany, both he and I are about to be unpleasantly surprised.
 France: A Spa - Gas
France: A Bur - Bel
France: F Por - MAO
France: F Bre - ENG (*bounce*)
France: F Mar - Spa/sc
France's strategy seems inspired by the English build of a fleet in London. Whatever its original purpose might have been, the fleet built in Marseilles is now headed north. If England lets that third fleet into the Mid-Atlantic, France will have a force advantage that will allow him to control all of the sea provinces on the Atlantic side of the isles and England will have more trouble from France than he bargained for.
 Germany: A Den - Swe (*bounce*)
Germany: A Mun - Sil
Germany: F Hol H
Germany: A Ber - Pru
Germany: A Kie - Mun
Ouch! I was clearly not anticipating this. It seems inconsistent with Germany's opening strategy, but the potential was there after the builds. I should have given more credence to the fact that Germany's builds gave him influence equivalent to my own over the key provinces of Prussia and Silesia. Warsaw is now lost, and I look a bit foolish in the process of losing it. Germany makes a peace offering of Belgium to France, but again writes a Hold order when the use of a signal order would have been more appropriate.
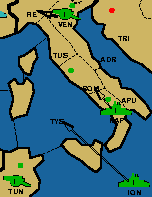 Italy: A Tun H
Italy: A Ven - Pie
Italy: F ION - TYS
Italy: F Nap - Rom
This is a serious over-reaction to the French build of a fleet in Marseilles. A lone French fleet in Marseilles is incapable of reaching an Italian SC in one year and, thus, constitutes almost no threat. Italy also failed to factor in the distraction to France of an English build of a fleet in London. There will be a loss of time for Italy involved in abandoning the Lepanto strategy, plus, an attack on France is tempo-consuming by nature and concedes control of critical eastern sea provinces to Turkey after the Sultan built a fleet in Smyrna. Italy's control of the key Ionian Sea space is already in dispute.
 Russia: A Rum S A Gal - Bud
Russia: A Gal - Bud
Russia: F Sev S A Rum
Russia: F Swe C (German) A Den - Swi (*void*)
Russia: A War - Gal
Russia: A StP S (English) A Nor
I continued in the south with the most obvious attack available against Austria and I am surprised that it worked. I used my units in Sweden and St. Petersburg to signal peaceful intent to England and Germany (the convoy to Switzerland being the traditional offering of peace) while I committed myself to the Austrian campaign. My plan was to attempt Norway in the Fall, when I anticipated that England would be in direct conflict with French fleets and might risk leaving that army unsupported, given my friendly support in the Spring. I didn't want to risk attempting Norway in the Spring, as the English army, if dislodged, would retreat to Finland and create an unpleasant guessing game regarding what to defend in the Fall. Given Germany's moves, however, a stab of England is now out of the question. It simply wouldn't work.
 Turkey: A Bul - Ser (*bounce*)
Turkey: A Con - Bul (*bounce*)
Turkey: F BLA S (Russian) F Sev - Rum (*void*)
Turkey: F Smy - AEG
Turkey only manages one successful tempo, but that's decieving. He's unambigously signalled his alliance intentions to Russia, while maintaining the leverage of occupying the Black Sea. He's done what he can to bring down Austria, which will certainly do him good in the near future. And he's the recipient of an unexpected gift in the form of Italy's withdrawal from the Ionian Sea. Thanks to his own presence in the Aegean Sea, the Turk is already disputing Italy's traditional early control of this space, which is the key to Turkey's future expansion.
After the Austrian's retreat from Budapest to Trieste, The good news is my unexpected good fortune in picking up Budapest and having such a cooperative Turkish partner. The bad news is that Warsaw is lost. I've only myself to blame for that, as the offensive potential in Germany's position was there to see had I not blinded myself. There's a good lesson here in always trying to approach each new turn as an entirely new board position.
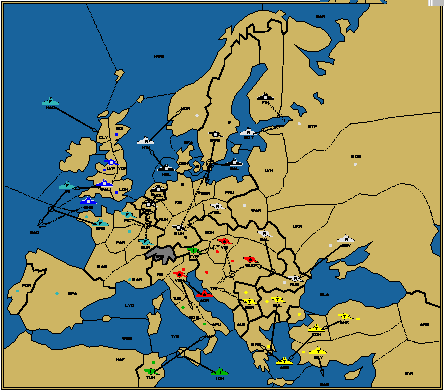
 Austria: A Tri - Bud (*bounce*)
Austria: A Ser - Rum (*bounce*)
Austria: F Gre - Bul/sc (*bounce*)
Austria: A Vie S A Tri - Bud (*cut*)
Were I Austria, I would have been more concerned about protecting Greece from Turkey. Budapest will only be retaken if Russia attempts either a useless defense of Warsaw or attempts to take Vienna in the Fall. The former is not likely and the latter would only result in an exchange of centers, with no hope of holding Budapest after that. Austria didn't accomplish anything, is holding on to Greece only by virtue of luck, and could actually be worse off if he had succeeded in recapturing Budapest. An alternative for Austria to consider was simply securing his centers and biding his time until the German attack forced Russia to loosen his grip. A bolder alternative was to seek a build by stabbing into Venice. The Italian obviously cannot be relied upon to help so the Austria might as well help himself to Italy's centers. After Italy's westward lunge in the Spring, his control of Venice is in dispute, and attempting the stab would have been a reasonable gambit.
 England: A Nor S (Russian) A StP
England: F NTH S F Lon - ENG
England: F IRI - MAO (*bounce*)
England: F Lon - ENG
England has to be happy about his position against France, who has abandoned the English front to fight the Italian bogeyman. England hasn't found a new SC this year, but he's improved his position a great deal, has no enemy but France, and is poised to strike against France in 1903. England now controls all sea provinces bordering the Isles and the zone of dispute between England and France has suddenly shifted to the French coast and the French soft spot at the Mid-Atlantic Ocean.
 France: A Gas - Mar
France: A Bel - Hol (*bounce*)
France: F MAO - WES
France: F Bre - MAO (*bounce*)
France: F Spa/sc - LYO
Now it's France's turn to over-react. The Italian threat did not merit this much attention, for the same geographic reasons that Italy was ill-advised to take the French build so much to heart. Aside from representing a certain waste of tempi, it's also not good for France to remove so much force influence from the English front, especially after poking a sharp stick at him, as this France did in the Spring. Finally, I very much question the attack on Holland. France will not gain an additional SC if it succeeds (as he does not yet own Belgium) and it only serves to antagonize Germany. It could represent a signal of alliance to England ("hey! let's attack Germany, instead of each other!"), but after France's S02, it's a weak signal that's likely to be ignored.
 Germany: A Den - Swe (*bounce*)
Germany: A Sil S A Pru - War
Germany: F Hol H
Germany: A Pru - War
Germany: A Mun - Boh
These moves are the logical follow-up to the German's Spring orders. I like the style of A Mun-Boh. Germany has picked his target and is going for the jugular. He now exerts decisive control over Galicia, Warsaw and Prussia, is disputing control of Livonia and Moscow and is exerting influence in Ukraine. Impressive progress. Seeing an E/F fleet war gives him the breathing room to temporarily expose his western flank.
 Italy: A Tun H
Italy: A Pie - Ven
Italy: F TYS - ION
Italy: F Rom - Nap
A complete reversal! All of 1902 is nullified for Italy. It borders on tautological to point out that you're not going to get anywhere shuffling your units back and forth. I'll be amazed if Italy recovers from this. His feint to the west has helped only England, by pulling France out of position, but now we shall see if France gives up the Franco-Italian war, or if Italy has invited disaster.
 Russia: A Rum S A Bud (*cut*)
Russia: A Bud S A Gal - Vie (*cut*)
Russia: F Sev S A Rum
Russia: F Swe - Den (*bounce*)
Russia: A Gal - Vie (*bounce*)
Russia: A StP S (English) A Nor
Conservative. And ugly. I did not accomplish a single thing this turn other than holding on to the status quo. I've got to become more active than this if I want to stay in this game. Thanks to my S02 tunnel vision, my advantage from 1901 is entirely lost and Germany is threatening to cut me in half.
 Turkey: A Bul - Ser (*bounce*)
Turkey: A Con - Bul (*bounce*)
Turkey: F BLA S A Con - Bul
Turkey: F AEG - Gre (*bounce*)
Quite frankly, I just don't know what Turkey was trying to accomplish this season. He doesn't support any attacks or attempt to move into the empty Ionian Sea. Perhaps he thought that I might support him into Serbia? Maybe I should have considered it to keep the Austrian from coming back after me while I defend myself from Germany.
Naturally, I'm unhappy with the loss of a home center, but my position is not critical. With the exception of Germany, none of the other players in this game has done particularly well. Austria is a poor tactician and will not stand up to a serious attack. Italy and Turkey have both wasted a lot of time. France and England are embarking on what is, typically, a prolonged fleet battle. If I can find a way to meet the German threat, I should still be in very good shape this game.
France:| | B A Par
| Germany: | | B F Ber
| |
The Kaiser is drawing a bead on Sweden. Time to gamble on England's Diplomacy smarts. He should see that using his army in Norway to defend my fleet in Sweden against the German is the way to go. That should allow me to get my St. Petersburg army into the game against Germany.
| Power | Tempo | |||
|---|---|---|---|---|
| 1902 | Game to Date | |||
| Available | Accomplished | Available | Accomplished | |
| Austria | 8 | 2 | 14 | 5 |
| England | 8 | 2 | 14 | 7 |
| France | 10 | 1 | 16 | 5 |
| Germany | 10 | 5 | 16 | 8 |
| Italy | 8 | 0 | 14 | 3 |
| Russia | 12 | 2 | 20 | 7 |
| Turkey | 8 | 1 | 14 | 4 |
France had a lot of movements succeed, but also did a lot of back-tracking. For example, his army that started in Marseilles is back in that center, resulting in a net of zero tempi for that unit's four orders in this game. England and Germany have used tempi most efficiently so far. Though I've wasted a lot of tempi, the advantage of being Russia -- extra units and extra tempi -- is helping me stay afloat. Austria and Turkey have both done poorly, but Italy has a meager three tempi to show for two years of development time.
It doesn't take a rocket scientist to see that I'd better get busy against Germany. He matches me in force, is ahead of me in tempi and has superior control of space, especially Russian provinces (not to mention control of one of my home supply centers!). I count myself in second place presently, owing primarily to my combined force and tempo advantage over the other five players. England and France are roughly equal, with England's tempo and space advantage presently offsetting France's force advantage. However, it's important to note that England's advantage will evaporate if he doesn't move to capitalize on it quickly. Turkey, Austria and Italy haven't accomplished much, but Turkey is best of those three. Italy, whose only active unit is the fleet in the Ionian Sea, has accomplished almost nothing and Austria is in even worse shape, having accomplished no more than Italy and presently being under attack by two powers. Tukey, by contrast, has three well deployed units and is poised for a breakthrough against either Austria or myself, depending upon who should fail first.
Austria succeeds in restoring the centers of his homeland, but loses Greece and two tempi--a very high price for victory. Austria now has exactly one unit outside a home center. Even though he's seemingly won a victory this turn, his position is palpably disintegrating. Given that Germany was in control of Galicia (despite my occupation of it), Austria should have considered a more active plan that assumed that I could not support the army in Budapest from Galicia. He retreats Greece to Albania, but my feeling is that he didn't have to give up Greece so easily.
England: A Nor - NTH - ENG - Pic (*bounce*)
England: F NTH C A Nor - Pic
England: F IRI - MAO (*bounce*)
England: F ENG C A Nor - Pic
England wastes all his tempi this turn and his positional advantage is rapidly fading as a result. England doesn't seem to be noticing that Germany is intending to take Sweden. If his convoy had succeeded, where does he think I'll retreat that dislodged fleet in the Fall? The convoy looks tempting, but in reality, it's a low percentage play. France had three units bordering Picardy, so his control of that province is undisputed. The odds of being able to land a unit there had to be considered low. England had the high percentage play in attacking Belgium with support. Given France and Germany's history, there was almost no chance of that unit being supported in place. England had to consider that his spatial and tempo advantage was temporary and seek to convert it to more immediate gains, such as taking Belgium.
France: A Mar - Pie (*bounce*)
France: A Bel - Hol (*bounce*)
France: F WES - MAO
France: F Bre S F WES - MAO
France: F LYO - Spa/sc
France: A Par - Pic
Since Italy wasn't a threat after all, France backtracks and faces England again. I actually have France at a net -1 tempo this turn, owing to this newest reversal of direction. Continuing to attack Holland is inane. Why antagonize Germany in this useless fashion?
Germany: A Den - Swe (*bounce*)
Germany: A Sil - War (*bounce*)
Germany: F Hol H
Germany: A War - Ukr
Germany: A Boh - Mun
Germany: F Ber - BAL
In a single turn, Germany goes from having a powerful cluster of armies controlling key provinces in western Russia to having three disconnected and uncoordinated armies that don't even reliably control Warsaw. He reacts to the hostile French orders for his army in Belgium and the presence of a French army in Paris by retreating his Bohemian army to Munich. The removal of this extra unit of force from the Russian front drains the momentum from his attack for the sake of passive defense. The army in the Ukraine is now cut off from his other units and is only good for protecting Warsaw. If he was going to try this play, then attempting my other soft spot at Livonia was probably the better route, as that would have set up more potential attack options in the Fall. What I had feared most was that he would support himself into Galicia. That would have presented me with an insurmountable defensive task. I should send France a thank-you note for those A Bel-Hol orders, as they've distracted Germany into a second rate continuation of his attack on me.
Italy: A Tun H
Italy: A Ven - Pie (*bounce*)
Italy: F ION S F Nap - TYS
Italy: F Nap - TYS
Yet another change of heart. At least now both of his fleets are at sea. That's progress of a sort.
Russia: A Rum S (Turkish) A Bul - Ser (*void*)
Russia: A Bud - Tri (*bounce, dislodged*)
Russia: F Sev S A Rum
Russia: F Swe - Den (*bounce*)
Russia: A Gal - War (*bounce*)
Russia: A StP - Mos
I knew when I wrote these orders that the army in Budapest was a goner, but it still hurts to see it go (along with its two tempi and the SC it occupied). I was anticipating the German's maneuver and considered it absolutely essential to my survival that he not succeed in occupying Warsaw and one of my soft spot provinces at the same time. That necessitated A Gal-War, which would leave the army in Budapest inadequately defended. The payoff is that Germany's armies are now separated and vulnerable and I have a legitimate opportunity to reclaim Warsaw and force him to remove a unit. I opted to support Turkey into Serbia one move too late. He evidently grew tired of waiting for that support and developed a new plan.
Turkey: A Bul - Gre
Turkey: A Con - Bul
Turkey: F BlA S A Con - Bul
Turkey: F AEG S A Bul - Gre
Turkey is the big winner this turn. He's the only power to gain two full tempi. Also, he is now projecting a strong influence into Serbia, has a lock on Greece, and has earned himself a new unit of force as a result.
This turn could have gone better, but I'm not completely unhappy. Everybody but Turkey pretty much spun their wheels this Spring and I'm not unhappy at all about Turkey's progress since it ensures that Austria won't prosper and, for now at least, Turkey has proven that he wishes to be my ally. Germany has gone from having a powerful cluster of armies in Warsaw, Silesia and Bohemia poised to tear into the heart of Russia to having three disconnected armies that aren't likely to hold his current gains. The first half of my gambit in giving up Budapest has paid off, as Germany lost much of his positional advantage. For now, this positional loss more than offsets his presence in Ukraine. I need to recapture Warsaw in the Fall, though, if I want to deal the Kaiser a lasting blow. I intend to go all out for this result.
Look, ma; no supports! Austria is playing without a plan at this point. His reoccupation of Galicia will not prove lasting.
England: A Nor S (Russian) F Swe
England: F NTH - ENG (*bounce*)
England: F IRI S F ENG - MAO
England: F ENG - MAO (*bounce*)
Whew! England recognized that his game doesn't get any better if Germany is in Sweden, and so he doesn't try that convoy again. The bad news is that his position is stagnating. Sooner or later, France will get around his defenses.
France: A Mar S A Par - Bur
France: A Bel - Hol (*bounce*)
France: F MAO - ENG (*bounce*)
France: F Bre S F MAO - ENG
France: F Spa/sc - MAO (*bounce*)
France: A Par - Bur
He's probing the English defenses. Personally, I like to try sneaking in the back door via NAO sooner rather than later. England has plenty of wherewithal to defend against a fleet in the Channel, since he has a superior force influence in that province. The force influence in NAO, however, is even and the English fleet in the Irish Sea can be considered an overburdened defender, being responsible for both the Channel and NAO. A direct attack on NAO spreads out England's defenses by forcing them to cover the entire perimiter of the Isles. England will generally fall more swiftly to such an attack since he is no longer able to concentrate his forces at a single breakthrough point. France has also moved from merely irritating Germany to full blown attack mode. That's a big break for me.
Germany: A Den S F BAL - Swe
Germany: A Sil - War (*bounce*)
Germany: F Hol H
Germany: A Ukr S A Sil - War (*cut*)
Germany: A Mun - Ruh
Germany: F BAL - Swe (*bounce*)
Germany wants to get a connected pair of armies into Russia and he lets this desire overrule his better judgment. A support from his army in Silesia was unbreakable, but the support from his army in Ukraine could be cut. Strategies making use of unbreakable supports must be preferred, especially when defending hotly contested SC's in the Fall. Germany's order of A Mun-Ruh seems to indicate that he was expecting to get a build this Fall from his attack on Sweden. Thank goodness for me that England crossed him up.
Italy: A Tun H
Italy: A Ven S (Austrian) A Tri (*void*)
Italy: F ION - EAS
Italy: F TYS - ION
Italy discovers a plan. A year late, his fleets arrive in the Lepanto position, but it will gain him nothing. Austria, his necessary Lepanto partner, is crumbling, and Turkey will have an extra unit of force to defend with after the build phase.
Russia: A Rum - Ukr (*bounce*)
Russia: F Sev - Rum (*bounce*)
Russia: F Swe H
Russia: A Gal - War
Russia: A Mos S A Gal - War
A let-it-all-hang-out plan to recapture Warsaw. It had a 50/50 shot at success and I am rewarded with a little luck for my effort. [Luck is where preparation meets opportunity.] I am also rewarded with the continuing loyalty of Turkish and English allies. Reviewing this now, I realize that I should have sent a friendly support to England, rather than the Hold order. You can't reaffirm those necessary alliances too often in a no-press game!
Turkey: A Gre S A Bul - Ser (*cut*)
Turkey: A Bul - Ser (*bounce*)
Turkey: F BLA - Bul/ec (*bounce*)
Turkey: F AEG S A Gre
It's hard to argue with these moves, though they didn't net any new gains. One can question the order for the fleet in the Aegean Sea, but it was possible that Italy would have tried to keep Turkey weak by supporting Austria back into Greece.
I'm very pleased to have recaptured Warsaw and forced a German removal. He has few practical choices in this regard. Giving up Budapest was worth this result. Turkey has ensured that I won't be sorry to have abandoned Budapest to Austria, while Italy and France have ensured that Turkey and England will remain my allies.
Germany:| | R A Ukr
| Russia: | | B F StP/sc
| Turkey: | | B F Smy
| |
Turkey's build is virtually forced, while mine is an unambiguous signal to England that Germany, and not Scandanavia, is now my target. Germany's removal is anti-positional and very tempo-costly. He removes a forward unit with force influence over four of my SC's that also represents a three tempo investment. Since Germany seems destined not to take Sweden now, he would have been better advised to remove the less powerful fleet in the Baltic Sea.
| Power | Tempo | |||
|---|---|---|---|---|
| 1903 | Game to Date | |||
| Available | Accomplished | Available | Accomplished | |
| Austria | 8 | -1 | 22 | 4 |
| England | 8 | 0 | 22 | 7 |
| France | 12 | 0 | 28 | 5 |
| Germany | 12 | -2 | 28 | 6 |
| Italy | 8 | 2 | 22 | 5 |
| Russia | 12 | -2 | 32 | 5 |
| Turkey | 8 | 2 | 22 | 6 |
Did I say that no-press games are slow developing? These tempo numbers sure bear that out. Imagine where Italy would be right now had he ignored the French build of a fleet in Marseilles in 1901 and embarked on a consistent plan of eastern conquest. Imagine how pretty England's game would look, if he had taken Belgium instead of trying that ill-fated convoy. Imagine how healthy Austria's game might be if he had defended against the initial Russian attacks with technical precision. The Russo-German war has been costly to both sides. Had Germany turned against France in 1902 instead of me, we could both be happily tearing into our neighbors' SC's right now and be two large powers dominating this game.
My own position is much improved from the end of 1902, and I'm happy to have survived my gross misclaculation regarding Germany's plans. As it stands, the prospects of France, Germany, Russia and Turkey are all about equal. Each of these powers has attained roughly equal tempo advancement and is now firmly in control of their home territories, soft spot provinces and "natural" neutrals. All of these powers stand roughly equal in time, space and force, and they all have opportunities to improve their positions. England and Italy still have prospects, but only if their neighbors make mistakes that they can capitalize upon. Austria's position is virtually without prospects of improvement, unless Turkey were to have a sudden (and unlikely) change of heart.
The only support that Austria writes is for his attack on Rumania, which is simply a useless gesture. Positionally, achieving the reoccupation of Serbia or attempting to bounce me out of Ukraine was more critical to his survival. He's never going to take Rumania with just two units, so he needs to focus on improving his control of the adjacent space.
England: A Nor - NTH - ENG - Pic
England: F NTH C A Nor - Pic
England: F IRI S F ENG
England: F ENG C A Nor - Pic
England's convoy works, but the result will be an unqualified disaster. France has three units of force influencing Picardy, and effectively controls every land and coastal province adjacent to it except Belgium, which is now equally influenced by Germany. England only has the Channel fleet to back this play in the Fall, unless he wants to lose Norway. If England was hoping that I wouldn't retreat to Norway after he abandoned the defense of Sweden, he's hoping in vain.
France: A Mar - Gas
France: A Bel H
France: F MAO - NAO
France: F Bre S F Spa/sc - MAO
France: F Spa/sc - MAO
France: A Bur S A Bel
As I said before, that move to NAO is a killer and more likely to succeed, owing to the static nature of England's overburdened defense. France picks up a trio of tempi this turn and is suddenly projecting his force influence into an English home SC. France is advertising a new policy of peace towards Germany now, but too late. It's now clear why antagonizing Germany by futilely attacking Holland was a bad idea. Belgium is now lost. The gains in tempo and space control that France is making against England this year, however, will more than compensate him for that loss of force.
Germany: A Den S F BAL - Swe
Germany: A Sil - Mun
Germany: F Hol S A Ruh - Bel
Germany: A Ruh - Bel (*bounce*)
Germany: F BAL - Swe
Germany has gained an SC at my expense (sort of, it's actually at England's expense) and has positioned himself for a forced win of Belgium in the Fall, unless England stands him off. The bulk of his forces are now arrayed against France and the remainder are directed at Scandanavia. His forces in Scandanavia are not effectively positioned for further gains this year, but I am exasperated that I've repulsed the German's attack, only to have England and France re-energize the German position by feeding him another SC (and likely two SC's) this year.
Italy: A Tun H
Italy: A Ven H
Italy: F EAS - AEG
Italy: F ION S F EAS - AEG
Italy is in the Aegean Sea now, but it will be too little and too late. He is no more able to threaten the Turk from here than from the Eastern Med. It looks like a positional gain, but it's illusory. Meanwhile, Italy has forsaken attempting the Lepanto convoy of A Tun-Ion-Eas-Syr (it wouldn't have worked, but he should have tried), which would be his only chance to generate some genuine threats against Turkish SC's. Italy will continue to play effectively a unit short, with an army uselessly stranded in Tunis.
Russia: A Rum S A Mos - Ukr (*cut*)
Russia: F Sev S A Rum
Russia: F Swe S F StP/sc - BOT (*cut, dislodged*)
Russia: A War S A Mos - Ukr
Russia: A Mos - Ukr
Russia: F StP/sc - BOT
England, England, wherefor art thou, England? Yet, the loss of Sweden, while annoying because it gives Germany a build, is not harmful to my own position. Meanwhile, Germany has retreated his armies from my border, conceding control of our border provinces to myself alone. I am also set to storm back into Galicia. Though I'm not going to take any SC's this year, I'm making solid positional gains. A case in point is my retreat from Sweden to Norway, which is actually a forward retreat and results in the pickup of a tempo.
Turkey: A Gre S A Bul - Ser (*cut*)
Turkey: A Bul - Ser (*bounce*)
Turkey: F BLA S (Russian) A Rum
Turkey: F AEG S F Smy - EAS (*dislodged*)
Turkey: F Smy - EAS
For the first time, I'm annoyed and concerned about my Turkish neighbor. Why is he hanging around the Black Sea to order useless supports when that fleet could deploy to Constantinople and assist in beating back the Italian? I'm very concerned now that Turkey, by retaining his influence over Sevastapol and Rumania, is contemplating stabbing me this Fall. However, in contrast to my forward retreat, Turkey's retreat from the Aegean Sea to Smyrna signals the likelihood of an upcoming F Bla-Con, which would make me very happy.
I would rate this turn an unqualified success for myself and a qualified success for France (who didn't wish to risk losing an SC, but should not find it a fatal setback). Germany has two builds, but he's fighting on two fronts and his position is insecure. These factors offset the force gains. England's convoy fixation has likely cost him Norway and placed him in grave positional danger, from which I believe he will not recover. Turkey and Italy's game of musical chairs in the Aegean and Eastern Mediterranian is not significant for either side. Austria hasn't much time left.
Too late, Austria discovers the positional virtue of attempting to occupy Serbia and fails. Now Galicia is lost and his home centers once again come under attack. This time, though, Turkey is better positioned, Austria's tactical possibilities are more limited and there is no chance that Germany will be his white knight. Austria retreats Galicia to Vienna, but a retreat to Silesia instead could have added some spice to Austria's moribund game. From there, the army would border three SC's (including a Russian SC) and there are always interesting possibilities involved in retreating into a key province like that.
England: A Pic - ENG - Wal
England: F NTH - Den (*bounce*)
England: F IRI - Lvp (*bounce*)
England: F ENG C A Pic - Wal
England runs up the white flag. This year has been devastating. He's surrendered space, lost tempi and is about to disband a unit of force. He has to be kicking himself, since France left Paris unguarded, while England's army ran away. Whenever you're fighting against the odds, it seldom makes sense to prefer defensive maneuvers to offensive ones. Cutting Germany's support at Denmark was a clever try. There was at least some chance that he could have restored Norway to himself that way. Germany's attempt to support him back into Norway was also predictable, however, and England's better bet to retain that SC.
France: A Gas S F Bre
France: A Bel - Pic
France: F NAO - Lvp (*bounce*)
France: F Bre S A Bel - Pic
France: F MAO S F Bre
France: A Bur - Mun (*bounce*)
I can understand risking Paris and I can understand wanting to give the army in Belgium a clear line of retreat, but France seems to have overlooked the possibility of a dislodged English army retreating into an unguarded Paris. If France intends to give up the defense of Belgium, A Bur-Ruh, A Bel-Bur, A Gas-Par (or A Gas S F Bre) were moves to consider, since they would keep the pressure on Germany. Neither France nor England were thinking about the forward retreat tactic this turn and France dodges a bullet when the English army runs away. Strongly to be considered as alternatives to F NAO-Lpl were F NAO-Iri and F NAO-Cly. Since England's F Iri-Lpl was practically forced, each of these orders would have improved France's control of space by allowing an English retreat.
Germany: A Den S F Swe (*cut*)
Germany: A Mun - Bur (*bounce*)
Germany: F Hol S A Ruh - Bel
Germany: A Ruh - Bel
Germany: F Swe S (English) F NTH - Nor (*void*)
Germany executes the forced win of Belgium and hangs on to Sweden. The attempt to support England back into Norway was predictable and I'm grateful that my erstwhile English ally didn't spite me. Germany has won two new SC's this turn, but can look forward to a 1905 of attempting to cover his positional weaknesses.
Italy: A Tun H
Italy: A Ven H
Italy: F AEG - Gre (*bounce*)
Italy: F ION S F AEG - Gre (*cut*)
And now we see how little good it did Italy to achieve the Aegean Sea. Turkey has more than adequate resources to meet this threat and faces no distractions from this task. Italy's A Tun remains stranded, while his A Ven sits at home and has never accomplished anything productive the entire game.
Russia: A Rum S A Ukr - Gal
Russia: F Sev S A Rum
Russia: F Nor - Swe (*bounce*)
Russia: A War S A Ukr - Gal
Russia: A Ukr - Gal
Russia: F BOT - BAL
Seeing that Germany will have two builds this year, I foreswear any speculative attempt to recapture Sweden to capitalize on what will be a certain positional gain. With a fleet in the Baltic Sea, I hope to "convince" Germany to build in Kiel and Berlin, but not Munich. The idea is to pin down Germany's new units in his own backyard and gain tempi for myself thereby. I hope to be adding builds from new Austrian conquests before Germany can get any new offensive rolling against myself.
Turkey: A Gre - Ser (*bounce*)
Turkey: A Bul S A Gre - Ser
Turkey: F BLA - Con
Turkey: F Smy - AEG (*bounce*)
Turkey: F EAS - ION (*bounce*)
There's a certain depth and cleverness to Turkey's moves. He ensures that his army in Greece cannot be dislodged. He knows that if he takes Serbia, he loses Greece and Italy gets a build, but he strives for it anyway because the positioning of both his armies and fleets will be improved if that happens. [The army will project more force influence in landlocked Serbia than it would in Greece, while at the same time, he would have had a fleet in either the Aegean or the Ionian, which would have been serious trouble for Italy.] These moves strove for active, positional play. I'm also thrilled to see his fleet steam out of the Black Sea. I'm finally free to maneuver the Rumanian army without fear of a stab from Turkey.
England:| | R F NTH
| France: | | R A Gas
| Germany: | | B F Kie, F Ber
| |
The move to the Baltic Sea pays off big time. There will be no German ground forces in my future. Getting both of those fleets into the game against me will be tempo consuming and much less efficient than a land assault. I now have the chance to crush Austria for good and use those builds to generate a land-based counter-offensive to what will be Germany's sea-borne assault.
| Power | Tempo | |||
|---|---|---|---|---|
| 1904 | Game to Date | |||
| Available | Accomplished | Available | Accomplished | |
| Austria | 8 | -1 | 30 | 3 |
| England | 8 | -3 | 30 | 4 |
| France | 12 | 1 | 30 | 6 |
| Germany | 10 | 1 | 38 | 7 |
| Italy | 8 | 0 | 30 | 5 |
| Russia | 12 | 5 | 44 | 10 |
| Turkey | 10 | 0 | 32 | 6 |
England's loss of tempo mirrors his loss of position and force. Austria's last place tempo count after four years is as good an illustration as any of the weakness of his game at this point. Germany's aquisition of two new SC's by shifting fronts has been tempo consuming. I've made great strides this year in use of tempo, which gives me a temporary advantage against Germany that offsets his builds.
I'm back in the saddle again. Germany's two builds have been greatly neutralized by my temporary advantage in tempo and force influence over space in his own heartland. It's also true that he's fighting a two front battle, which will further slow him. I have an opportunity, perhaps, to convert my tempo advantage into something useful. France's loss of Belgium is a temporary setback, as the whole of the British Isles should open before him. Austria will get crushed between the Russian hammer and the Turkish anvil. After that, the Turkish advantage in tempo and force should turn the tide against the Italian, while I hope to use my share of Austrian builds to fuel a renewed effort against Germany. A Russo-Turkish Juggernaut is finally on track and ready to roll.
In one turn, England's position went from viable to hopeless. In the EOG's I asked England why he was so insistent on trying this convoy and what he was hoping to accomplish that would offset the loss of Norway. England's reply stated that in light of "the war with France" and his need to bring all of his forces to bear against his enemy, he hadn't been considering the security of his SC in Norway at all. Even in no-press mode, Diplomacy is a strategic game first and a tactical game second. England needed to fashion strategic objectives and play for them if he hoped to make progress. Throwing units at a single enemy without a plan for playing the whole board is not the path to victory.
It's now been four seasons since an Austrian unit moved by virtue of anything other than a retreat. Austria's attempt to reoccupy the key province of Galicia is predictably futile, as my force influence over that province is greater than his own. The attempt costs him Serbia, which should have been of much greater concern to him. The Turkish army in Serbia will shortly undermine his position, as the combined ground forces of Turkey and Russia will outgun and outflank the three Austrian armies. Attempting to support Italy into Greece was a good try.
England: A Wal - Lvp
England: F IRI S F ENG - MAO (*cut*)
England: F ENG - MAO (*bounce, dislodged*)
England is going down fighting. Attacking the Mid-Atlantic Ocean with support was a good try, as he could well have been successful with the correct guess of France's moves. He guessed wrong, however, and France's superior force will now drive back the outgunned English navy. England retreats his fleet to London to begin the home defense.
France: A Pic S A Bur
France: F NAO - IRI (*bounce*)
France: F Bre S F MAO - ENG
France: F MAO - ENG
France: A Bur S A Pic
France uses the unbreakable support to force his way into the key Channel province. This was a real gamble, as England could have entered the Mid-Atlantic Ocean from Irish Sea unsupported on this move, taken Portugal in the Fall, and stuck a nasty thorn into France's side in that fashion. A good alternative was to continue to stretch the coverage of the overburdened English defenders with F NAO-Cly, after which England must voluntarily retreat his units to protect his SC's (i.e., A Lpl-Edi and F Iri-Lpl) and France makes continued positional progress risk-free.
Germany: A Den - Swe
Germany: A Mun S (French) A Bur
Germany: F Hol S A Bel
Germany: A Bel S F Hol
Germany: F Swe - Fin
Germany: F Kie S F Ber - BAL
Germany: F Ber - BAL
Germany makes a peace overture to France and renews his attack on me. This turn is tempo-successful for him in that respect, but his army in Sweden is not cooperating with his fleets and he will not be able to exert serious force influence against me as he did before, nor will he generate a decisive attack on any of my centers this year. The fleet in Finland would be much better positioned in either the Gulf of Bothnia or Skagerrak, where it would exert a more powerful influence over the surrounding provinces.
Italy: A Tun H
Italy: A Ven - Tyr
Italy: F AEG H (*dislodged*)
Italy: F ION S F AEG
Supporting the outgunned fleet in place is a weak strategy. Like England, Italy would have been better off trying to outguess his attacker and sneak into an SC (his retreat to the south coast of Bulgaria leaves his unit exposed for the Fall without hope of keeping the center). Supporting himself into Greece would have actually worked. Supporting himself in place had no hope of accomplishing anything. A good rule to follow: when outgunned, attack and hope to hit a weak point; standing in place only lets your opponent aim all of his own guns at you. Italy is finally desparate enough to go snipe hunting with his northern army. He is no doubt hoping that I will support him into Munich.
Russia: A Rum S A Gal
Russia: F Sev S A Rum
Russia: F Nor - NTH
Russia: A War - Sil
Russia: A Gal S A War - Sil (*cut*)
Russia: F BAL - Ber (*bounce, dislodged*)
I was not actually expecting to be in the North Sea, as this move was primarily designed to bounce an expected F Hol-Nth. Nevertheless, I'm not unhapppy to be there, as my occupation of this province has to be giving Germany headaches regarding what I will do from there. The dislodging of my fleet in Baltic Sea was expected. My thrust into Silesia puts some pressure on German home SC's. I don't expect to take any, but I expect to slow the German down. I didn't attempt Budapest because I saw that as a low percentage play in the Spring, as I'd have little chance of holding it in the Fall. I retreated my dislodged fleet to the Gulf of Bothnia. Retreating to Denmark would have been terrific, giving me a connected pair of fleets on Germany's opposite flank, but St. Petersburg needs to be defended. I would have given up St. Pete to get this positional advantage, if I could have gotten an SC in trade for it. But I couldn't afford to give up a unit this year without conceding too much advantage to Germany.
Turkey: A Gre S A Bul - Ser
Turkey: A Bul - Ser
Turkey: F Con S F EAS - AEG
Turkey: F Smy S F EAS - AEG
Turkey: F Eas - AEG
I'll bet Turkey was expecting to destroy the Italian fleet and was surprised that his army succeeded in moving to Serbia. No matter, because the strategy succeeds either way. The Italian Fleet is swept into a holding pen, surrounded by Turkish forces, where it will be crushed in the Fall. The trapping and destruction of Italy's forward fleet will crush the attack for good.
England, Austria and Italy have all been dealt serious blows this turn and their positions will only get worse from here. Turkey and France will capitalize on their declining neighbors, while Germany and Russia resume their costly conflict. I am dismayed at the disorganized posture of my units. I am concerned that my Austrian builds will not come in time to shore up my precarious position in the north.
A desparate Austria stabs at Italy to keep his center count at four. But by undermining Italy, he puts himself all the more at Turkey's mercy. Austria has bounced from no plan to futile plans to a self-destructive plan.
England: A LVP H
England: F IRI - MAO (*bounce, dislodged*)
England: F Lon - ENG
Still fighting, but at this point, it's a losing cause. England chooses to retreat his dislodged fleet to Wales. A more stubborn defense could have been achieved by disbanding the fleet and building an army in Edinburgh. A pair of armies in the Isles is very tough to defeat.
France: A Pic S A Bur - Bel
France: F NAO S F ENG - IRI
France: F Bre - MAO (*bounce*)
France: F ENG - IRI
France: A Bur - Bel (*bounce*)
Squeezing England's position one province at a time. I still like the idea of sneaking in England's back door. One of the primary advantages an attacker has over an overburdened defender is superior mobility. France should be doing more to capitalize on this advantage. I'm happy to see the attempt on Belgium. If Germany could have felt comfortable shifting more forces to the Russian front, I'd have been in trouble.
Germany: A Swe - Nor (*bounce*)
Germany: A Mun - Ber (*bounce*)
Germany: F Hol S A Bel
Germany: A Bel S F Hol (*cut*)
Germany: F Fin - StP/sc (*bounce*)
Germany: F Kie - HEL
Germany: F Bal - Ber (*bounce*)
Germany's need to protect his home centers prevents him from attempting positional progress against me this turn. He would have been better off allowing my moves to Norway and St. Petersburg to succeed, as my resulting position would have been passive, allowing him room to maneuver next Spring. Letting your opponent retreat into the centers he is trying to protect is often a good strategy. It makes his defense static, and a static defense is a weak one.
Italy: A Tun H
Italy: A Tyr - Mun (*bounce*)
Italy: F Bul/sc - Gre (*bounce, dislodged*)
Italy: F ION S F Bul/sc - Gre
Between the Austrian stab and the destruction of his forward fleet, Italy's game is over. It was not unreasonable of Italy to leave Venice open like this. Austria's treachery was irrational, though an understandable desperate bid for survival, and Italy realizes an undeserved result.
Russia: A Rum - Bud (*bounce*)
Russia: F Sev - Rum (*bounce*)
Russia: F NTH - Nor (*bounce*)
Russia: A Sil - Mun (*bounce*)
Russia: A Gal S A Rum - Bud
Russia: F BOT - StP/sc (*bounce*)
Germany and I duel to a standoff this turn. I had been hoping for either Turkey's support into Budapest or Austria's repetition of his attempt on Galicia, but I didn't get any breaks. I might have done myself in with greed. I knew that Italy would be attacking Munich and could have supported him in to force a German removal. Instead, I attacked Munich, hoping for French support that didn't materialize. I should have taken the sure bet, as now the opportunity to deprive Germany of Munich is gone. Italy is certain to break off and turn his attention toward Austria now.
Turkey: A Gre - Bul
Turkey: A Ser S A Gre - Bul
Turkey: F Con S A Gre - Bul
Turkey: F Smy S F Aeg
Turkey: F AEG S A Gre - Bul
Turkey correctly anticipates Italy's attempt to support his trapped fleet into Greece and meets the maneuver with superior force. With the forward Italian fleet eliminated and Italy stabbed, it will be clear sailing for the Turkish navy.
Turkey:| | B A Ank
| |
This both signals continued friendship to Russia and keeps the army/fleet units in Turkey's military balanced. For the moment, Turkey has more fleets than he does sea lanes to maneuver them through.
| Power | Tempo | |||
|---|---|---|---|---|
| 1905 | Game to Date | |||
| Available | Accomplished | Available | Accomplished | |
| Austria | 8 | 1 | 38 | 4 |
| England | 6 | -2 | 36 | 2 |
| France | 10 | 1 | 50 | 7 |
| Germany | 14 | 4 | 52 | 11 |
| Italy | 8 | -1 | 38 | 4 |
| Russia | 12 | 1 | 56 | 11 |
| Turkey | 10 | 0 | 42 | 6 |
Germany closed the tempo gap between us in a hurry and I'm not happy to have squandered my temporary advantage in tempi. Austria, England and Italy all reflect their dire straits in their tempo counts. Italy's extra two tempi over England actually counts against him, as those represent the tempi expended in convoying an army to Tunis, where it has remained this entire game--out of play and ineffective. Though their maneuvering this year has been effective, real progress for France and Turkey has been slow coming.
Germany has to be counted the game leader again. He leads in tempo and force and has more of my SC's and key provinces at risk than I do of his. France is pinning down three of Germany's units, but that still leaves Germany a four-to-three force advantage against me. If Germany gets aggressive and manages to coordinate an attack against Scandanavia and St. Petersburg, I could be in serious trouble again. Turkey is poised for major progress in the upcoming year. I could be a beneficiary of Turkey's growth by picking up Budapest and Vienna if Turkey remains an ally. France's ability to pick up an English SC is by no means certain. He risks falling seriously behind Turkey and Germany if he can't maneuver more decisively against England this year.
Austria can't get away with not protecting Budapest this time. I've got no reason not to try for it with the third Austrian army away on an Italian expedition. Austria's swift collapse proves the futility of the stab. Getting extra supply centers is worthless if you have to completely destroy your position to do it.
England: A Lvp H
England: F Wal - IRI
England: F ENG - MAO (*bounce*)
With enemies on all sides of him, the English commander had no good strategies left.
France: A Pic S A Bur - Bel
France: F NAO - Cly
France: F Bre S F IRI - MAO
France: F IRI - MAO
France: A Bur - Bel (*bounce*)
France finally stretches the static, overburdended English defender (the army in Liverpool) with the move to Clyde. He's late in discovering this maneuver, however, and now has a German rival in the race for English centers. I'm disappointed that France still hasn't seen fit to support me into Munich. Germany is just as much a danger to France as to me.
Germany: A Swe - BAL - Ber
Germany: A Mun S A Swe - Ber (*cut*)
Germany: F Hol S A Bel
Germany: A Bel S F Hol (*cut*)
Germany: F Fin - StP/sc (*bounce*)
Germany: F HEL - NTH
Germany: F BAL C A Swe - Ber
Germany is so distracted by his percieved need to defend his home centers that he willingly sacrifices three tempi to return the Swedish army to its point of origin in Berlin. Further, instead of aggressively challenging my weak position in Scandanavia, he is devoting his resources to passive defense. Pursuing a strategy of projecting force into Germany's home provinces, even at the potential cost of weakening my own control over other space, has paid off handsomely. Germany has responded by willingly depriving himself of tempi and control of other space, all in the name of self-defense.
Italy: A Tun - ION - Nap
Italy: A Tyr - Vie (*bounce*)
Italy: F ION C A Tun - Nap
The army returns from its long exile in Tunis, but it's too late.
Russia: A Rum - Bud
Russia: F Sev - Rum
Russia: F NTH - Nor
Russia: A Sil - Mun (*bounce*)
Russia: A Gal S A Rum - Bud
Russia: F BOT - StP/sc (*bounce*)
This time, Budapest is mine for keeps. Those builds from Austrian centers will arrive in time to secure my position after all. I continue to defend Norway, rather than attack the German position, because to lose Norway in the Spring is also to lose St. Petersburg in the Fall. In essence, the northern fleet defends two SC's. With Germany's withdrawal of a unit of force from Sweden, my position in Scandanavia is suddenly secure. I'm already contemplating my builds and planning my counter-offensive.
Turkey: A Bul S F AEG - Gre
Turkey: A Ser - Tri (*bounce*)
Turkey: F Con - AEG
Turkey: F Smy - EAS
Turkey: F AEG - Gre
Turkey: A Ank - Con
With Austria and Italy at war, the floodgates suddenly open for Turkey. The speed of his progress this year will be a wonder.
Two things concern me at the end of this turn. First, France has taken far too long to finish off England. Now that Germany is in the North Sea, he has a decent shot at beating France to London and/or Edinburgh. Second, now that the Turkish genie is out of the bottle, will he still be my ally, or will he stab me at Rumania this fall to slow my growth and try to keep me from building in Sevastapol?
Why the self bounce? Does he believe that he'll be able to build in Trieste after the Fall? He actually could have if he disbanded his dislodged army, but he chooses to retreat it to Bohemia, not that it makes a real difference at this point.
England: A Lvp H
England: F IRI - MAO
England: F ENG S F IRI - MAO (*dislodged*)
England was relying on a good probability that France and Germany would bounce each other out of Edinburgh. A reasonable gamble, but he lost, and he retreats the Channel fleet to London once more.
France: A Pic S A Bur - Bel
France: F Cly - Lvp (*bounce*)
France: F Bre S F MAO - ENG
France: F MAO - ENG
France: A Bur - Bel (*bounce*)
An unimaginative repetition of the same tactics he used in this position in Spring of 1903. England learned from his prior experience with this position and snuck into the unprotected Mid-Atlantic soft spot. That's going to cause the French commander a headache. France stubbornly refuses to support me into Munich, even while making a gift of Edinburgh to Germany.
Germany: A Ber S A Mun
Germany: A Mun S A Ber (*cut*)
Germany: F Hol S A Bel
Germany: A Bel S F Hol (*cut*)
Germany: F Fin S F BAL - Swe
Germany: F NTH - Edi
Germany: F BAL - Swe
Germany strolls into another SC that he hasn't earned and my frustration with Germany prospering by the poor tactics of his western neighbors continues. Germany's passive support of his army in Munich proves that my continued attacks on Munich are worth something, even if France isn't responding. The possibility that France may respond bluffs Germany into continuing a passive defensive posture in which he makes no use of either his force in the area or their tempo potential.
Italy: A Nap - Rom (*bounce*)
Italy: A Tyr S (Austrian) A Rom - Ven (*void*)
Italy: F ION - Nap (*bounce, dislodged*)
Italy desperately begs his Austrian brother for peace, but Austria can't afford to listen. By disbanding the Ionian Sea fleet rather than retreating it, Italy decides to go down fighting Austria and invites Turkey to have Tunis.
Russia: A Bud S A Gal - Vie
Russia: F Rum S (Turkish) A Bul
Russia: F Nor - StP/nc (*bounce*)
Russia: A Sil - Mun (*bounce*)
Russia: A Gal - Vie
Russia: F BOT - StP/sc (*bounce*)
As an alternative to my self-bounce in St. Petersburg, I seriously considered supporting myself into Sweden, though that would very likely only succeed if I lost St. Pete. The point of the swap would have been that my two northern fleets would form a connected pair, while the German fleet that landed in St. Petersburg would be isolated and weak, making recapture of that SC relatively easy. I determined, though, that keeping St. Pete was the better plan because I could keep it open and build there. Building in St. Petersburg will give me an opportunity to win Sweden next year. This plan conserves tempi and is therefore swifter from the point of view of the mobilization of all of my forces.
Turkey: A Bul S A Ser
Turkey: A Ser S A Bul
Turkey: F AEG S F EAS - ION
Turkey: F EAS - ION
Turkey: F Gre - Alb
Turkey: A Con S A Bul
Turkey's orders for his armies are overly conservative and a waste of tempi. I had no reasonable opportunity to stab Turkey and he had no reason to believe that attempting further forward progress risked anything. Still, Turkey's position is hugely improved from a year ago and he will overrun the Italian and Austrian weaklings in the near future.
England:| | R F Lon
| Russia: | | B F StP/sc, A War
| Germany: | | B A Kie
| |
England keeps his fleet in the Mid-Atlantic to spite France. Germany balances his land and sea forces, but building an army in Kiel means an extra tempo expended in activating it. I intend to attempt Sweden, while keeping Warsaw secure from Germany this time. I also hope that Turkey noticed that I didn't build in Sevastapol.
| Power | Tempo | |||
|---|---|---|---|---|
| 1906 | Game to Date | |||
| Available | Accomplished | Available | Accomplished | |
| Austria | 7 | 0 | 45 | 5 |
| England | 6 | 0 | 42 | 2 |
| France | 10 | 1 | 60 | 8 |
| Germany | 14 | 0 | 66 | 11 |
| Italy | 6 | -2 | 44 | 2 |
| Russia | 12 | 2 | 68 | 13 |
| Turkey | 12 | 6 | 54 | 12 |
The big story is obviously Turkey. With his enemies warring in front of him, Turkey sweeps out of his corner. For all of his successful moves, Germany's net tempo count is zero, with his surrender of three tempi in returning the army in Sweden to Berlin.
Germany and I are at tempo parity and force parity. At the moment, I feel I have the advantage because, since Germany is fighting on two fronts, he will find it very difficult to bring sufficient force to bear against me without critically weakening his control of space on the opposite front and incurring losses there. Turkey is only slightly behind Germany and I. Though he trails us by two SC's, he should make that up very shortly by picking up centers from the squabbling Asutria and Italy. It's my estimation that Turkey will likely continue our alliance as long as he has easy Austrian and Italian SC's to claim. I'll need to watch for the knife after that but, hopefully, by then I'll have put Germany out of the picture. France, behind in tempi and force, and without the spatial control to force new gains on his own, is flirting with also-ran status.

Nothing can save him now.
England: A Lvp - Edi
England: F MAO H
Even in his death throes, England can be clever. Why rush into an Iberian SC? They're not going anywhere. Hold in the Mid-Atlantic and force France to waste another tempo.
France: A Pic S A Bur - Bel
France: F Cly - Lvp
France: F Bre - MAO (*bounce*)
France: F ENG - Lon
France: A Bur - Bel
Three new SC's, plus the concession of all disputed provinces by Germany. This is practically a gift from the Diplomacy gods. Actually, it's a gift from Germany, who has abandoned his French front to pursue a new strategy. France hasn't done anything different or clever, but persistence pays off. France, like myself, has been banking on the fact that Germany can't afford to split his units between two fronts indefinately.
Germany: A Ber - Sil
Germany: A Mun S A Ber - Sil
Germany: F Hol - NTH
Germany: A Bel - Hol
Germany: F Fin S F Swe - BOT (*cut*)
Germany: F Edi - NWG
Germany: F Swe - BOT (*bounce, dislodged*)
Germany: A Kie - Den
After Germany's relatively passive 1906, these aggressive moves are a shock. Suddenly, I face a five-to-three force disadvantage in Scandanavia and I've lost positional control there as a result. My recapture of Sweden looks very temporary (with Germany retreating his fleet to the Baltic) and Norway is lost. Germany has sacrificed heavily to achieve these gains, however, giving up both Belgium and Edinburgh to bring all of his forces to bear against me. As a result, both he and I are likely to face a removal this year, while France picks up two SC's on the cheap.
Italy: A Nap - Apu
Italy: A Tyr - Vie (*bounce*)
I don't understand the attack on Vienna. Why pick on me at this point?
Russia: A Bud - Gal
Russia: F Rum C (Turkish) A Bul - Tri
Russia: F Nor S F BOT - Swe
Russia: A Sil - Boh (*bounce, dislodged*)
Russia: A Vie S A Sil - Boh (*cut*)
Russia: F BOT - Swe
Russia: F StP/sc - Fin (*bounce*)
Russia: A War - Pru
I expected to be secure in keeping Norway or Sweden, and possibly both. Now it seems I'll keep niether and there will be a swarm of black units swallowing up the north. As I'd planned several years ago, however, my compensation is an overwhelming ground attack against Germany proper, though for now I retreat my Silesia army to Warsaw. The Kaiser will take Scandanavia, and St. Petersburg if he's determined, but I'll roll through everything south of Denwark while he does so. Thanks to France's continued beligerence, the German commander has waited too long to commit his forces against me and when he does, the price is too great for him to succeed. Turkey's moves are a joy to me. It appears that I'll be able to count on his alliance for some time yet.
Turkey: A Bul - Ser
Turkey: A Ser - Alb
Turkey: F AEG C A Con - Gre
Turkey: F ION S F Alb - ADR
Turkey: F Alb - ADR
Turkey: A Con - AEG - Gre
More tremendous strides in tempo, together with a rapid increase in control of new space. Turkey will also pick up two SC's, adding a force lead to his lead in tempo. Since he's already picking up advantages by the fistful, Turkey forswears opening up a front with Russia this turn.

England: A Edi H
England: F MAO - Spa/sc
France: A Pic S A Bel
France: F Lvp C (Turkish) A Ser - Kie
France: F Bre - MAO
France: F Lon C (Turkish) A Alb - NAf
France: A Bel H
The problem with winning three new SC's in the Spring is that you have to sit on them in the Fall. France makes the best of it by writing signal convoys for his Fleets, but the signals aren't very sensible. France is signalling for a Turkish alliance, but it's hard to see why either player would expect such a thing to materialize. Had he sent a signal to Turkey and a signal to Russia, that would have laid the groundwork for working toward a three-way draw. It's either going to be that or a fight to the finish. The fleet built in Brest all the way back in 1901 finally makes its first sojourn out of port. Six years is a long time to wait to develop a unit.
Germany: A Sil H (*dislodged*)
Germany: A Mun - Ber
Germany: F NTH - Nor
Germany: A Hol S (French) A Bel
Germany: F Fin S A Den - Swe
Germany: F NWG S F NTH - Nor
Germany: F BAL S A Den - Swe
Germany: A Den - Swe
All the obvious moves. I knew they were coming. I just couldn't stop them.
Italy: A Apu S A Tyr - Ven
Italy: A Tyr - Ven
Russia: A Gal - Boh
Russia: F Rum C (Turkish) A Ser - Tri
Russia: F Nor - StP/nc
Russia: A War - Sil
Russia: A Vie S A Gal - Boh
Russia: F Swe - Nor (*bounce, dislodged*)
Russia: F StP/sc - BOT
Russia: A Pru S A War - Sil
I count these moves a huge success. By occupying Bohemia, Silesia and Prussia, I'm putting overwhelming pressure on Berlin and Munich. Instead of trying for Berlin this year, I focused on positioning. As a special bonus, there are dislodged armies from Bohemia and Silesia that are very likely to both be retreating to Munich. If I've guessed correctly, the German will retreat his army to Munich to defend that SC from an Austrian retreat, while the Austrian will also retreat to Munich and both armies will vanish from the center of the board. Then I'll simply steamroll my connected group of armies through Germany next year and that will be that. I don't even want to think about how much pain that a German forward retreat to Galicia would cause me. The convoy signal is my way of asking Turkey to advance his units away from our mutual front. I also am able to retreat forward to Skagerrak, where my unit continues to exert pressure on all three Scandinavian centers.
Turkey: A Ser - Bul (*bounce*)
Turkey: A Alb - Tri
Turkey: F AEG - ION
Turkey: F ION - Tun
Turkey: F ADR S A Alb - Tri
Turkey: A Gre - Bul (*bounce*)
Turkey continues to surge forward. I'm disappointed at his self bounce in Bulgaria. Does he really believe that I'd go for that suicidal one-center stab this turn? I'll have to try to account for Turkish paranoia in future orders.
Austria:| | waive (unusable)
| Italy: | | R A Ven
| Russia: | | R F Rum
| |
If Turkey wants to stab me, this is the turn to do it. I felt that my removal was forced. My position in the north against the advancing German forces is precarious. My three fleets, though disconnected, can all cooperate to attempt to hold St. Petersburg, or attempt to re-occupy Sweden or Norway. German forces outnumber me in that theater, but my ability to concentrate my three forces on a single target keeps Germany off-balance, so I can't afford to remove a northern fleet. Removing any of the northern three armies gives up my forced attack on German SC's. Giving up the army in Vienna is as inviting to Turkish treachery as removing the fleet in Rumania. I'm gambling that a Sultan who has remained loyal for seven years will remain loyal for an eighth. As I said before, I don't think that he'll come after me until he sweeps up all of the Austrian and Italian centers that are left. This removal leaves me with 100% of my forces arrayed against Germany.
France:| | B A Par, F Mar
| Turkey: | | B A Con, F Smy
| |
Turkey's builds show a continued commitment to our alliance. France builds a fleet in Marseilles. I hope that he is looking beyond the English fleet in Spain to the threat that Turkey will pose to him very soon.
| Power | Tempo | |||
|---|---|---|---|---|
| 1906 | Game to Date | |||
| Available | Accomplished | Available | Accomplished | |
| Austria | 3 | 0 | 51 | 4 |
| England | 4 | 2 | 46 | 4 |
| France | 10 | 3 | 70 | 11 |
| Germany | 16 | 3 | 82 | 14 |
| Italy | 4 | -1 | 48 | 1 |
| Russia | 16 | 4 | 84 | 17 |
| Turkey | 12 | 6 | 66 | 18 |
We're at that stage of the game where the rich simply get richer. Notably, Turkey has tripled his tempo count and nearly doubled his size in just two years. It pays to have your enemies stab each other in front of you. Similarly, France has Germany to thank for his success. First, for taking Edinburgh from England, then for abandoning the French front to pursue Russia.
Even after the German hit me with everything he had, he could not achieve a winning position. To the contrary, I am set to steamroll his homeland. With Austria reduced to a peripatetic unit in Naples, I've no distractions from German conquest in the upcoming year. That is, unless Turkey stabs me, which is a tolerable risk and one I had to take to ensure that I can secure my position against the German aggressor. With a suddenly large and hostile France to his west now equalling the size and hostility of Russia to his East, Germany is finished, despite his apparent equal size. France and I will grow from German conquest, but Turkey leads, with even geater opportunities for growth in front of him.
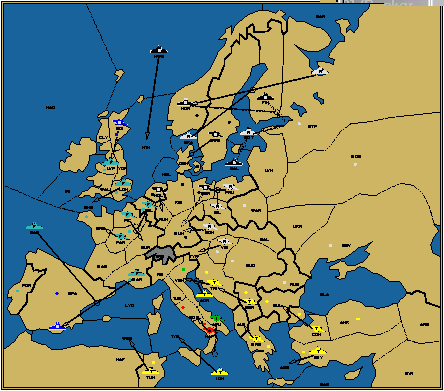
England: A Edi - Lvp (*bounce*)
England: F Spa/sc - Mar (*bounce, dislodged*)
England tries as best he can to stave off elimination, then retreats his dislodged fleet to the Gulf of Lyon.
France: A Pic - Bur
France: F Lvp H
France: F MAO S F Mar - Spa/sc
France: F Lon - ENG
France: A Bel S A Pic - Bur
France: A Par - Bre
France: F Mar - Spa/sc
France apparently intends to convoy his new army to the Isles. Granted, that last English SC will not fall without a second unit to dislodge the English army, but Turkish fleets are swarming accross the Mediterranian like killer bees. France doesn't seem to appreciate the tremendous gains in tempo and force that Turkey has made in the last two years and the danger that poses.
Germany: A Ber - Mun (*bounce, dislodged*)
Germany: F Nor S F Fin - StP/sc (*dislodged*)
Germany: A Hol - Ruh
Germany: F Fin - StP/sc (*bounce*)
Germany: F NWG - NTH
Germany: F BAL - BOT (*bounce*)
Germany: A Swe - Den
After attaining an aggressive position in Scandanavia, Germany enters a set of very weak orders, failing to put that force he'd concentrated there to any use. He backs off half of his force and makes an easily countered attack on St. Petersburg. Having effectively ceded me control of all of the Scandanavian provinces, he now has no hope of either reclaiming his losses or even of capturing St. Petersburg to spite me. Additionally, with his retreat from Norway to Sweden, he again forsakes the forward retreat for the passive one. Retreating to Barents Sea would have given me many more headaches. The dislodged Berlin retreats to Kiel.
Italy: A Apu S (Turkish) F ION - Nap (*void*)
Playing purely for spite.
Russia: A Boh - Mun (*bounce*)
Russia: F StP/nc - Nor
Russia: A Sil S A Pru - Ber
Russia: A Vie - Tyr
Russia: F SKA S F StP/nc - Nor
Russia: F BOT - StP/sc (*bounce*)
Russia: A Pru - Ber
Better than I'd hoped. There was no reason to believe that I'd actually achieve Norway. Thankfully, Germany's previous year of aggression was an aberration and he has returned to his preference for defensive maneuvers, willingly conceding space and robbing himself of tempo. My attack succeeds all the more quickly for that. Turkey can simply walk into two of my SC's this Fall, and if he doesn't stab me, it will be a miracle. Without builds from Germany to compensate, I'd be finished. My vulnerable position vis a vis Turkey is the price I've paid for German conquest. I simply continue to hope that Turkey will be too distracted by his swift progress to stab me.
Turkey: A Ser - Tri
Turkey: A Tri - Ven
Turkey: F ION - TYS
Turkey: F Tun - WES
Turkey: F ADR S A Tri - Ven
Turkey: A Greece - Alb
Turkey: A Con - Bul
Turkey: F Smy - AEG
Turkey continues to storm out over the board, as seven of eight orders result in a gain of tempo. He has Venice in hand and an invitation to take Naples. He has complete control of Austria, the Balkans and the Eastern half of the Mediterranian and he is rapidly securing control of Italy and the Western Mediterranian. His control of Austria and the Balkans includes absolute control of Budapest and Rumania and he has nothing to lose by depriving me of those SC's. It's hard to imagine ever being more in the driver's seat than Turkey is at the end of this season.
After this season, it's apparent that this game will resolve itself into a three way battle between France, Russia and Turkey. I fear that the issue will rapidly become the ability of Russia and France to stalemate Turkey before he reaches 18 SC's.
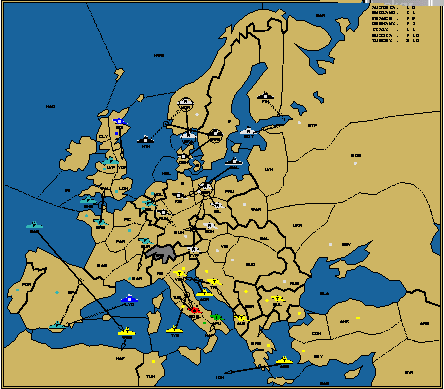
Suicide. Bad form.
England: A Edi - Yor
England: F LYO - Spa/sc (*bounce*)
Hoping, I suppose, for Turkish support. F GoL S F Spa/sc-Mar was worth a try, anticipating a potential self-bounce by France. If the unwanted support succeeds, England might still own Spain. I salute England for going down fighting for his position, rather than being tempted by spite or suicide.
France: A Bur - Mar
France: F Lvp H
France: F MAO - WES
France: F ENG C A Bre - Wal
France: A Bel - Hol
France: A Bre - ENG - Wal
France: F Spa/sc S F MAO - WES (*cut*)
France follows through with his convoy plan, but he also recognizes the need to oppose Turkey's domination of the Med (hurray!). France snaps off an SC from the dying German, improves his control of space and has a very tempo-successful turn as well.
Germany: A Kie - Ber (*bounce*)
Germany: F Swe S F NTH - Nor
Germany: A Ruh - Mun (*bounce*)
Germany: F Fin - StP/sc (*bounce*)
Germany: F NTH - Nor (*bounce*)
Germany: F BAL S A Kiel - Ber
Germany: A Den S F Swe
Berlin and Norway were irretrievably lost. Germany had to find a more useful plan. Saving Munich and Holland was still possible. Maneuvering to put pressure on St. Petersburg was still possible. These orders, however, were doomed to failure and lost two more SC's for no reason.
Italy: A Apu - Nap
Russia: A Boh - Mun
Russia: F Nor S F SKA (*cut*)
Russia: A Sil S A Ber
Russia: A Tyr S A Boh - Mun
Russia: F SKA S F Nor
Russia: F BOT - StP/sc (*bounce*)
Russia: A Ber S A Boh - Mun (*cut*)
Securing my Spring gains and adding Munich to them. I had no right to expect to get Munich, but one never gains anything without trying and there was nothing better to do.
Turkey: A Tri - Ven
Turkey: A Ven - Rom
Turkey: F TYS S A Ven - Rom
Turkey: F WES - NAf
Turkey: F ADR S A Tri - Ven
Turkey: A Alb - Tri
Turkey: A Bul - Gre
Turkey: F AEG - ION
Turkey's swift expansion is aided by Austrian suicide. I can't begin to describe my ecstasy at seeing Turkey forego the stab. He even backed away from those centers. I suppose that Turkey calculated that it was more sensible to continue an alliance which had allowed him such tremendous progress in the last three years. That would not have been my calculation. Turkey will wage a long slow battle for many years to come, as a result of this missed opportunity.
Austria:| | R A Tus
| England: | | R F LYO
| Germany: | | R A Ruh, F NTH, F BAL
| |
France:| | B A Par, F Bre
| Turkey: | | B A Con, F Smy
| |
Russia:| | B F StP/sc, A War, A Mos
| |
| Power | Tempo | |||
|---|---|---|---|---|
| 1908 | Game to Date | |||
| Available | Accomplished | Available | Accomplished | |
| Austria | 2 | -4 | 53 | OUT |
| England | 4 | -3 | 50 | 1 |
| France | 14 | 6 | 84 | 17 |
| Germany | 14 | -10 | 96 | 4 |
| Italy | 2 | 0 | 50 | 1 |
| Russia | 14 | 1 | 98 | 18 |
| Turkey | 16 | 11 | 82 | 29 |
The speed of Germany's destruction is astonishing, and a testament to the futility of playing defensively. The speed of Turkey's growth is equally astonishing. The Russo-Turkish alliance has allowed me to defeat Germany, but it's given far more gains to Turkey than I've won for myself. I must begin to work on slowing Turkey down. Germany's gifts to France have created a French power nearly on a par with Russia and Turkey. At this point, that's good. I'd prefer to see Turkey get a little competition in front of him.
It took until 1908 to get our first elimination. I leave Austria in the tempo count to illustrate a point. One of the dominant powers left in this game has only managed to move forward by 17 tempi. Austria had 53 orders to write in this game and was alive for eight game years. That's more than ample opportunity to achieve 17 tempi, get three to four builds and to make something of this game. It's tempting to say that Austria's elimination is typical, expected and excusable in a no-press game, since he begins the game surrounded, but that's not the story here. This Austria enjoyed an alliance with Italy until he destroyed it with a stab. This Austria could have easily held his ground against an early Russian assault that should not have worked, then counter-attacked when the Russian was reeling under pressure from German armies. But, time and again, this Austria missed opportunities. This Austria is gone, not because he was attacked, but because he was a less capable tactician than his attackers.
The game is rapidly entering an end-game stage; a three way dynamic. Turkey is in the best position to push his advantage on two fronts, but he shouldn't be able to cross the stalemate lines if I get decent cooperation from France on that point. France and Russia both straddle the stalemate lines, but that sword cuts both ways. If either of us get too big, Turkey should throw his wieght behind the smaller player to maintain balance. Properly played, this ending shouldn't result in anything but a draw.
In a more immediate sense, the specifics of my position are pretty good. The moment of tremendous vulnerability to a Turkish stab has passed. I am in firm control of Scandanavia and the German homeland now and should pick up those last three German SC's for myself, making me the dominant power on the board, as measured by force. I intend to move at least two armies toward the Turkish front. My intention is not to stab, but to restore some force influence over the SC's I own in Austria and the Balkans. This is likely to cause some tension, but I'm hoping that my Turkish ally will not see this as a stab and over-react. Even if he does, I should be able to compensate with the German SC's I pick up and keep Turkey from doing serious damage before help from France arrives. At any rate, with all of the minor powers dead or nearly so, I no longer consider the risk of a Turkish stab minimal.
There is a popular saying among chess players that the game of chess is won by the player making the second to last mistake. The point of the saying is that no one is capable of playing the perfect game and more games are won by taking advantage of the unsound play of others than by the personal brilliance of the winning player. This game aptly illustrates that prinicple in action at the Diplomacy board.
None of the dominant players in this game has played perfectly. France became ascendent in the E/F conflict only because England's last tactical miscue negated his own. France's ascendency over Germany also has much more to do with Germany's strategic choices in this game than his own. In my own case, an early gross miscalculation resulted in the loss of Warsaw to Germany and the creation of a potentially crippling positional disadvantage. Twice more after that, Germany could have seriously crippled my efforts by aggressively following up on an advantage I failed to prevent him from achieving. Additionally, the G/R rivalry resulted in an overwhelming moment of weakness vis a vis Turkey that could just as easily have ruined my game as anything else. Turkey's play in this game is as close to perfect as it gets, but I find fault in his conservative treatment of the R/T alliance: first, in needlessly worrying about petty one-center stabs; and, later, passing up a golden stab opportunity of his own. He and I stand as equals, more or less, when he could likely be towering over me and everyone else in the game.
Conversely, none of the other players has been done in by just a single mistake. The other four players all had to commit multiple strategic and tactical errors to achieve lesser power status. Even Austria could have recovered from the early loss of Budapest had he defended correctly after that and stayed viable long enough to sieze Russia's later moments of weakness caused by the G/R conflict. It should be said, though, that Italy has less margin for error than other nations. Other powers in this game did not suffer as greatly as did Italy for early game reversals of direction and strategy. That this mistake alone more or less did in Italy is a good illustration of why Italy is such a hard power to play.
Finally, it is worth noting that opening moves often had little to say about the subsequent directions players took in the game. England's 1901 indicated a desire to pursue advantage in Scandanavia, but that plan was quickly abandoned. Germany's 1901 indicated a strategy of rushing to the west and, in 1902, he promply rushed to the east. France's 1901 build in the south was actually a prelude to an attack in the north. Russia's early desire for a southern strategy had to be quickly abandoned for an active hand in northern affairs. Turkey's early occupation of the Black Sea did not raise tensions with Russia, but rather had the effect of cementing a Russo-Turkish alliance. Opening strategy articles tend to vastly overrate the effect that 1901 has on the remainder of the game. Press or no press, far more is decided by the strategies players choose subsequent to 1901 than is affected by their activities in the opening year.
At this point, I'll conclude this initial article, and we'll continue next time from 1909. Here at the end of 1908, the opening stages of the game have clearly run their course, so now we're set to see what the end-game holds.
Until then....

Paul Windsor
([email protected])
If you wish to e-mail feedback on this article to the author, and clicking
on the mail address above
does not work for you, feel free to use the
"Dear DP..." mail interface.