

Common traits of successful Diplomacy have been well documented in the past. Some of these include:
Its often the case that you need to see something in action to work out how to do it yourself. This year I played in a game called Wave where putting the above advice into action turned out rather well. I took over a four centre on-the-ropes Germany, survived, built up through the mid-game and strategically set up a climactic move to go from 12 SC’s to 20 SC’s within one year to solo.
To show what kind of results can be achieved by implementing the above advice, I thought I’d present an adaptation of the Wave end of game summary.
For those who are looking for ideas on how to improve their game, the eog goes into some mechanics - what kind of press I was sending, what I was thinking, how the big picture led to the little pictures, why alliances were formed and changed and the like.
To those of you already converted ... hopefully you’ll find the game an enjoyable example of setting up the mid-game so as to avoid the end-game altogether!
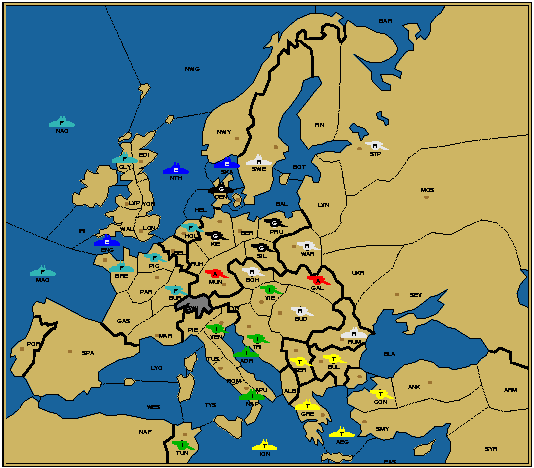 |
Looking at previous moves, it seemed that Russia and Turkey had used Italy to beat up on Austria (now down to one unit which was in hiding in Munich) and were poised to launch into Italy’s Austrian gains, into Germany and into Scandinavia - a Juggernaut in the making. France had meanwhile started into England (now down to three SC’s). Was the move into Holland the start of an F-R alliance to take down England and Germany? Was Austria going to help Russia or France as punishment for previous German actions?
The first step was to find out the diplomatic picture and repair the damage caused by previous German leaders. Missives were sent to everyone.
From England, Russia and Austria, no reply. Turkey was non-committal. Italy and France were friendly.
Once the replies started coming in, it became clearer that a Juggernaut had developed. I developed the 'Moral Rectitude' strategy that carried me successfully through the game. Broadcasts to EFIA went out stating all the reasons why a Juggernaut existed (citing past moves), how we were all kaput if we didn't band together and that we had a moral obligation as Diplomacy players never to allow a Juggernaut to succeed (a little bit of theatre never hurts!)
Why would this be tempting to other players? To England, I could promise Scandinavian centres that he needed to help fight off France. To Austria, it allowed him an opportunity to reclaim his home centres and survive. It gave Italy allies to help him keep his Balkan gains and fight off Turkey who was sending fleets his way. To France, letting England send troops against Russia kept England’s back door open for France to slip in.
Therefore I requested a beat-up-Russia mission to all players (even Turkey who seemed wedded to the Juggernaut) and asked for peace from France whilst he finished off England. France was the big surprise. His mail back explained that he had had a long alliance with Germany and he wanted it to continue whilst he finished off England (joy) and that he had covered Holland from am English North Sea-Holland move for me in the Spring and was going to retreat Holland to Belgium in the Fall (more joy) now that England needed North Sea to protect her home centres. And he was true to his word, for which I felt a deep debt of gratitude which I intended to repay (more on this later).
Italy was friendly and knew the Russian threat (Russia had just taken Italy’s Budapest) and was happy to be part of a burgeoning G-A-I despite the fact that he'd stabbed Austria repeatedly.
The one-centre Austria in Munich played a no-press game (due to other game commitments we found out later). Through the years, I made sure each movement plan I constructed and sent out for the G-A-I furthered Austria getting back home to reclaim his home centres, had Italy helping him against the common threat, whilst pointing out that Italy needed to go south against Turkey so there was a place for Austria in the mid-game if he cooperated. So even though we didn't hear from Austria for some years, he left Munich and more or less followed each plan.
When the moves were processed, England continued an unsuccessful attack with Russia on Denmark. I was able to sneak Warsaw from an over confident Russia, giving me a build when France retreated from Holland as promised. The first step, survival, was looking ok.
With England's agreement (he needed the SC's after all to fight off France), the Anti-Juggernaut Alliance was born.
Each turn, mail would go to England suggesting he support me into a Russian SC (be it Sweden, or Stp later on) and he'd reply no way, he'd only continue the Russian fight if I supported him in. And so it was. I realised that if Russia was defeated, I'd have no one in my rear (a luxury for Germany) and I could throw all my units north and west against England and France (which is what I was telling IA) or I could throw all my units south (which is what I was telling EF).
I'd send joint mails to IA every turn with a plan that tried to meet both their objectives (For Austria, survival and re-build; for Italy, an SC to build a fleet to fight off Turkey and then to head off south).
Mail went to Turkey every turn telling him the board was aligned against the Juggernaut and that a stab on Russia was his only chance for survival. But he was honourable to the Juggernaut to his credit and never stabbed, despite my sending detailed plans on exactly how he could do it. I would send Turkey occasional tip-offs (disguised as thoughts) on what the I-A moves were going to be to hold up progress in the south a little whilst I cleaned up Russia. Turkey began to ask advice on what he thought he should do, to which I replied fairly truthfully as I didn't want Italy to succeed too fast and I suspected I’d need Turkey’s help in the future.
Within a year or two, I encouraged a peace deal between I and T, which from the IG side was always a ruse to get Turkey to hold off some and it was planned that Italy just keep charging forward. The beauty of this was that it fostered long term distrust between Italy and Turkey which we in the north (well, England and I) enjoyed immensely as we could continue without being molested from the south. To Turkey I of course blamed Italy for breaking the pact, saying how untrustworthy he was, which was the foundation of Turkey and Germany later getting together. My advice / leaks to Turkey after this were pretty well accurate. To Italy, it was a plan well executed as it put Turkey on the back foot somewhat and we congratulated ourselves.
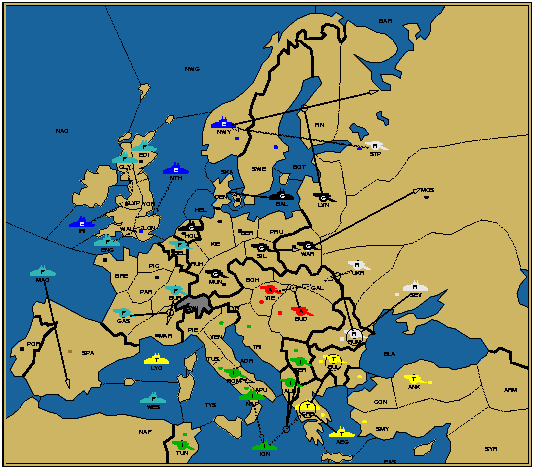
After I took Warsaw in Fall 04, Russia finally opened comms, promising to go south. Yeah right. I submitted proposals swapping Sweden for Warsaw for two turns whilst he replaced Swe with Norway, but each turn his acceptance / counter proposal arrived minutes before the move results came through and I'd have to 'apologise' that his acceptance came too late. This showed to me he was never serious and was just trying to get me to back off so he could re-take the advantage and come at me in strength. Very poor diploming. If you're going to try something like that, you needs heaps of early and detailed mail to get it all fleshed out in time. But my proposals weren't that serious anyway. I was just trying to keep the comms lines open if I needed Russia’s help later. I was on a good deal anyway ... just the one enemy with a lot of allies. I had no reason to make peace with Russia.
So the attack continued. Although I didn't bag another SC in 1905, I got units into Prussia and Silesia (some tricky stuff holding Warsaw which required a decision box for the best moves) and Russia lost Swe to England. At this point he resigned without explanation. My first win for the game!
Russia disbanding the northern fleet and having a new Russian leader proved a stroke of luck. It was three armies on three at the time and it looked like tough going (hence the fear that IA might get SC’s faster than G at the time). I immediately submitted a bogus peace proposal with a detailed plan that had him taking on Turkey with the rest of the board while I took on England and France. Russia did move away, but not as decisively as I had requested. I'd slipped into Baltic and Livonia whilst England had moved Sweden to Norway. I apologised to the new Tsar, saying I only moved there as I didn't know whether I could trust him or not and with a backup plan in mind, which was to convoy Liv to Swe and move Warsaw to Galicia for an Austrian assault. I detailed for him the Sev-Black Sea, Moscow-Sev moves which would convince me he really wanted to take on Turkey. Instead Livonia supported Norway to Stp and Warsaw slipped into an unprotected Moscow ... a coup I was very proud of. Russia went from four to two, leaving mop-up left and my units pretty much free for the next target whilst Italy and Turkey were still banging heads.
Everytime the G-I-A had a success, I'd make a point of sending a Woo-hoo mail with some ascii pictures of Russian Vodka six packs, some funny story of where I'd picked up it up from and then submit a follow up plan for the next stage. Italy and I had great banter going on for a while over the green bats induced by the vodka and the like.
Meanwhile, I didn't want France getting the English centres before I'd diminished Russia, otherwise he'd likely very quickly follow up through my unprotected western back door. So England and I started hitting it off. Much mail, detailed. I started becoming a confidante, helping him out with his defence of England, whilst suggesting attacks to France that I knew wouldn't work. Not lies mind you, just thoughts and suggestions. All the time, I was still planning to stab into the Scandinavian SC's (in return for the Holland debt) so that France and I would finish in the north at the same time and go south, linking up with Turkey or Italy (whoever was best placed) for the three-way draw.
Strangely France went quiet for a couple of years - I suspect it was work, but it was a bad move. He built in Brest despite an agreement to build his fleets in Mar. France continued attacking England despite the anti-Juggernaut agreement, which was fair enough (what else does he do?), but it was one-dimensional stuff. Lots of holding, bouncing and no long term plan. He kept fleets in reserve against a possible Turkish fleet attack (which were in Ion/Tys I think) which was ludicrous given the state of the board instead of throwing everything into a two year plan, getting an army into England, whatever. Mind you, I was happy in one respect because his fleets were positioned to go into the Med and England being alive kept him from launching into me.
Throughout 1906 I asked for Bur to move to Mar, but France refused to move it. As I kept saying to him, if you're going after Italy next, you'd have no hesitation moving it. If it remains, you could only be going into Germany. His explanation was he wanted Mar free to build (despite there being no way he could get a build that turn). I made it a condition that Bur-Mar happens before I take Scandinavia. Anyway I helped England into Stp in order to take down Russia, Bur moved and I apologised profusely to France about England getting a fourth SC and said that I was ready to take Scandinavia now that Russia was almost buried.
So with 1906 finished, Germany had gained Moscow and reclaimed Munich, moved to seven centres with Sev available next year for eight, had no enemies of consequence, allies everywhere. How to solo from here?
 |
Meanwhile, I had submitted a proposal to England for my Danish fleet to enter the North Sea to help support the English fleets back home, getting all our fleets into action. England replied “no risk, no gain, a reluctant ok”. He was well aware of the risk of leaving Scandinavia unprotected, but what else could he do with French fleets in Edi and English, etc. England and I swapped about 10 mails that turn. France none. If he had communicated I would likely have repaid my Holland debt and taken out Scandinavia and gone for the F-G-T three-way, the carebear that I am (grin).
At this point, England must have been dreading the move results coming in given the ease with which I could stab him. But it was becoming clear I could work with England. He had good tactical and strategic skills and was very communicative. France had made no progress against him. If I allied with England he would be sending all his troops west against France in order to take back the England centres (Liv and Edi had been lost), leaving those Scandinavian centres behind ready for the taking at any moment without any defenses. Additionally, both Turkey and Italy wanted me to take on France to stop him charging into the Med.
The result - charge the new army builds into the Ruhr to take Belgium, take the North Sea and ally firmly with England!
I took Sev and made sure Rumania wasn't taken by Austria in the Spring by leaking the plans to Turkey and getting him to tap Italy's Serbian support. I then induced Italy to stab Austria, pointing out that where else was Austria going to grow except by taking Italy's Austrian / Balkans SC's. And that being the case, how was Italy going to take on Turkey successfully without some more fleet builds that could only be got with the Austrian SC's he didn't currently have. I of course also offered to send troops into Sev / Armenia in the future to support him into Turkey. And there was no reason not to trust me - we'd worked seemingly superbly to that point.
This meant I wouldn’t have to give up Sev, my 8th build, and that I could take a share of other ‘Austrian’ centres without ever having stabbed. Excellent.
I immediately took Rumania off Austria with Italian support (who had no idea what was coming in the Fall), with appropriate apologies and excuses to Austria. Turkey convoyed an army into Greece.
In the Fall, I made good my outrage as Turkey and Germany performed a dual stab of Italy - Germany taking Budapest and Turkey taking Serbia. It was a wonderful plan that had Italy gasping and left him with no presence of note in the Balkans. I could now further apologise to Austria and say, look I really did hit Italy as revenge for you, I just needed Rumania to do it ;-)
The beauty of the Italian stab was that now I had two allies (England and Turkey) who were obliged to send all their troops west against their enemies, leaving gaping holes in the areas behind them. I also had agreements with both of them that they would only build fleets and (with England) that I would only build armies. Turkey could build armies with the SC's taken on the Italian mainland and Tunis, but not beforehand, and that proved key. I suggested Sev / Bla / Arm as a DMZ on an impulse to keep Turkey happy and onside. I didn't know whether to regret it or not at the time because I suspected if I wanted 18 I would want to get armies into Sev - Arm - Ank/Smy but the Turkish trust I gained was worth it in the end.
During 1909 in the south, I had to finish off Austria's Vienna and support Turkey's two armies into Tri/Ser/Bul. My plan was to stretch Turkey’s armies so they couldn't all be protected at once in 1910 (the projected solo year), especially if I knew how they were moving as we were coordinating plans against Italy and Austria.
In the north, each turn I continued to send detailed plans for moves that required me to remain in the North Sea and to help England from there. North Sea supported England from Norway to Norwegian Sea and into Edi, I arranged for my armies to tap French support where I could to help England take Brest, and generally arranged for English fleets to keep heading for the Med as much as I could saying he needed to take Iberia and get some of the Italian spoils before Turkey got there. I had options to take Scandinavia every turn, but suspected my French ally was lost forever at this stage (he refused to respond to any mail - very poor diploming). The aim at this point was to stab England when I ran out of excuses for having a fleet in the North Sea.
My biggest problem by 1909 was that I'd now grown to 11 SC’s whilst the next biggest were sevens and fives. Lots of press to E and T saying how I wanted the three-way, and expressing moral outrage regarding France (who had kept attacking England and so not helping the AJA) and Italy (the AJA stabber). I discussed how I wanted Paris and Vienna but nothing else, Mar was English, Vienna was Turkish, etc, trying to reassure both countries that I wasn't going to solo. Whilst I had the plan and the option, I still didn't know I was going to go for it until a day before I did it. The plan had been percolating in my head on how to do it since Sev was taken but I wasn't sure I wanted to betray England who'd been a great ally (although circumstance forced the alliance on him in some respects).
In the north in Spring 09, a tricky situation had developed. We had a French fleet in Yorkshire facing elimination between English fleets in Lon and Edi with my fleet in North Sea having no reason to hang around in the Fall if the elimination succeeded. I thought about a Fall stab, but it would only have given me one centre or none (a convoy to Yorkshire?). Counting SC's, I was only on 11, Scandinavia would take me to 14, Vie, Tri and Ser 17. I needed Paris or an English mainland SC as Venice was marginal and Gre and Bul were protected by fleets. It was still too early to stab England.
I submitted a plan where the English fleets kept barraging into the Mao and Brest in a push for the other French centres, and where North Sea was required to support the Edi fleet into Yorkshire, freeing England’s London fleet for action to Wales / Channel and pushing the French Yorkshire fleet to London and then out again. By then Liverpool and hopefully another French SC would have been taken, leaving France on four or three. When England agreed, I breathed a sigh of relief as the stab could be put off for another year - when I’d be in a better position to take the other SC's, especially Paris.
The additional threat that year was the new French leader (the old French leader having resigned - a second win!). I opened the comms line with some alliance suggestions, telling him how vindictive the Englander was against France. France really had no choice but to ally with England though - to ally with Germany would have given me the Scandinavian centres immediately to take me to 15 and I would have build fleets to come after France on the English mainland.
The big worry in the disbands phase of 1909 was what was France going to disband. It had to be that fleet in Nao for my Belgium to Norway convoy plan to work, otherwise my fleet would have had to go to Norwegian to bounce him out of there - hence no convoy, no quick win. I sent some subtle suggestions that we could work together again, mentioning possible bounces in the south against that vindictive Englander that would help France survive and I ignored mentioning Nao completely (being careful not to talk about builds and disbands in the builds phase). I don't know if that had any influence or not, but thankfully Nao was disbanded. I personally would have kept it to try and get around into the English Scandinavian centres and have England scurrying around after it.
Not only did the 1909 moves have to ensure Belgium held so that he’d be free for the Norway convoy, but I also had to ensure that Munich had a reason to hold so that my army build at the end of the year had to happen in Kiel to enable it to get to Sweden in two turns. England should probably have insisted that Kiel was a no-build zone but I was lucky he never mentioned it. I also had to ensure I could get Paris in Spring 1910 (with England's Bre-Gas tap) to guarantee that 18th SC. If I didn't get Paris, I needed Venice (unlikely with Italy’s two armies and fleet support), Bulgaria (impossible with Turkish fleet support), Marseilles (impossible once a fleet got to Lyons) or get armies around into Sev / Arm. Paris was critical.
In 1910, the North Sea again faced eviction - its job was done. I came up with a plan to send it to Yorkshire to be eliminated in the Fall between Edi and Lon and replaced with an army build. This appealed to England - we'd been talking about how to get rid of my fleets for some years and he jumped at the chance to eliminate it thinking he'd be safe from now on. Any other move (back to Denmark, etc) endangered his Scandinavian SC's and we both wanted a North Sea DMZ. I wouldn't allow him to take North Sea to disband my fleet after all ! This plan had the side benefit of stranding Edi and Lon in position, helpless - if England had come up with a plan to protect Scandinavia from that turn on (Edi-Norwegian, Lon-Yor ?), I would have been bounced from that final SC.
In the south, Turkey was stretched and ripe for the plucking after he’d chased the Italian centre of Trieste from Serbia.
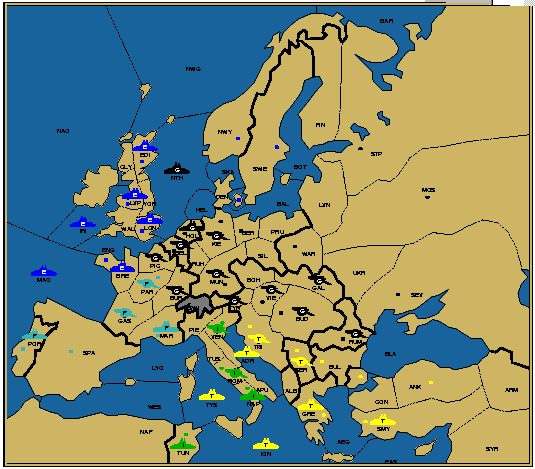 |
So from 12 centres, the solo move was launched:
Paris was taken with armies as England tapped possible French support, unaware of the Scandinavian stab. (16).
In the south, Turkey had seen danger and tried to alleviate it by asking for withdrawals. The agreed plan was that my Tyrolia would help Turkey take Venice, that my Budapest would retreat and that my Rumania would bounce over an empty Bulgaria with Turkey’s Serbia. That of course meant that Rumania and Budapest were able to take Serbia (17) and Tyrolia and Vienna take Trieste (18).
In the Fall, I asked France to help me take Brest from England (as I put it, in retaliation against England for letting me solo) and he agreed (19) and I took a pot shot at Venice which worked as well (the 20th).
The Wave Spring 1910 move was certainly one of the more satisfying of my Diploming career!
On the other hand, England knew he was playing riskily. I'd had so many options to stab and never had and he was only one turn away from one of my fleets being destroyed and being safe. We'd sent so much mail, and I was attempting to alleviate his fears at every step and continually looking out for his interests, that I understand why he wanted to continue against France and go for the E-T-G three-way. Nonetheless, the big mistake was losing sight of the actual board position and possibly being blinded by the E-G-T picture I'd been drawing.
An E-T-G three-way is not a natural three-way in many ways. Germany sits in the middle begging to be squeezed in a two front war. I'd alleviated that prospect by insisting on fleet builds but it was a long term concern. It was interesting to see my goals shifted from survival to a F-G-I or F-G-T three-way, to an E-G-T three-way with prospects for a solo, to a solo.
I think it would have been difficult for Italy to see the stab coming. When Turkey refused to stab Russia, Italy had no choice but to go after Turkey. Italy’s mistake was to create too much mistrust with Turkey with the peace plan and broken promises. If Italy'd managed to attack Turkey without lying to him, then when it was clear I was starting to dominate the board when Russia was broken, there should have been the possibility of allying with Turkey and pressing me from the south. The mistrust probably spoilt that chance and I always felt secure that once I allied with Turkey, he would continue to go after Italy in vengeance and because he felt he couldn't trust you.
The original France suffered from lack of press and by not seeing the game through his ally’s eyes, doing builds and moves that may have seemed innocuous for France but were antagonistic to his ally (Germany).
The various Austrian leaders played well in trying to get back to Austria and build. They played consistently in Austria's best interests rather than resorting to short term vengeance alliances. Unfortunately, they were probably always doomed once Russia cracked quickly. Italy and I, and later Turkey, would have cleaned them up no matter whether they kept true to the AIG or not - it was just a matter of time. But by playing true to the AIG they at least stayed in the game and had a chance of getting bigger if Italy or Germany had been distracted elsewhere (by France say).
To Turkey, probably the same mistake as England re actual board position. Austria needed protection at the end to ensure I didn't have five armies on two and there needed to be an insistence that Germany withdraw before Turkish troops were stretched thin.
Re the Russian leaders ... I found the first one taciturn, a bit arrogant, demanding and generally a poor diplomer. Not a happy prospective ally. The second probably needed to have communicated with everyone a bit more to find out I had engineered an anti-Russian alliance, which may have led him to not being as gullible.
The lessons I learnt or verified for myself is that the advice mentioned at the start works. I had success leading the board, sent lots of press to everyone, allies and enemies both, and tried to meet my allies’ objectives with each plan I presented.
Except at the end, I only ever had one enemy at a time, and that was dictated by counting where my 18 SC’s would come from. I allied with England because I could take the Scandinavian centres at any time. From France I only needed two centres (Belgium and Paris) which could be got with English help. I allied with Turkey over Italy as it meant I could get the Austrian SC’s and half of the Balkan’ SC’s. Allying with Italy meant giving up some of these. A lesson perhaps learnt by other players in all this was to see the board as it actually is, not how its being diplomed.
So whilst this wasn’t an expert’s showcase game, by illustrating an ordinary game played by mere mortals, hopefully you’ll have found some insights to enable you to improve against players of all kinds in the types of games that we tend to play most.
And finally a last thought ... I wonder what the previous two German leaders who resigned before I joined would be thinking if they saw the end result? A lesson that no position is unrecoverable!
 |
Pat Brennan
(fleur.vogelsang@bigpond.com) |
If you wish to e-mail feedback on this article to the author, and clicking on the envelope above does not work for you, feel free to use the "Dear DP..." mail interface.